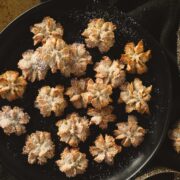
Italian Almond Snowflake Cookies
These Italian Almond Snowflake Cookies are absolutely stunning, made with almond flour and dusted with powdered sugar, they resemble snowflakes, each one unique.
Servings: 50 small cookies
Calories: 36kcal
Ingredients
- 2 large egg whites
- ¾ cup granulated sugar 148g
- 1¾ cup almond flour 168g
- ½ cup powdered sugar 56g
Instructions
- Prep: Preheat the oven to 350°F. Prepare a piping bag fitted with a large star tip with a wide opening (I use Wilton 1M). The wider the opening the easier it is to pipe the dough.
- Make the Dough: In a large mixing bowl, beat the egg whites at medium speed for 1 minute, until they form soft peaks. Add the granulated sugar and combine. Add the almond flour and combine.
- Piping Bag: Scoop the dough into the prepared piping bag so that the piping bag is roughly halfway full (if it’s too full, you won’t have the leverage to pipe the dough through the tip).
- Shape the Cookies: Press a small amount of the dough from the piping bag onto a baking sheet into a snowflake shape. Release, lift up the piping bag, then press again to create a second “snowflake” on top of the first one. This creates one cookie. Continue making snowflake cookies on the baking sheet with a half inch of room in between each cookie, creating 25 cookies on the baking sheet. Repeat with a second baking sheet for 50 cookies total.
- Bake: Bake the cookies, one baking sheet at a time, at 350°F for 9 minutes or until browned along the tops and edges but still white in places that have less direct exposure to the heat. Remove, let cool for 2-3 minutes. Then remove the cookies to a plate or wire rack. Do not wait to transfer the cookies or the sugar will harden on the baking sheet making them much more difficult to remove.
- Powdered Sugar: Let the cookies cool fully, then dust lightly with powdered sugar.
Notes
- Start Small: When starting to pipe the cookies, add only a small amount of the cookie dough to the piping bag to get the hang of it. The less dough that there is in the bag, the easier it is to press the dough through the piping tip. It also gives you a chance to practice without committing all the dough to the bag.
- Practice Piping: You can practice creating the snowflake shape on a plate before creating them directly on a baking sheet. If you’re happy with how they look, you can gently transfer them to the baking sheet, or add the dough back to the bag and create new ones, now that you’ve honed your piping skills.
- Large Piping Tip: Use a large star-shaped piping tip. Smaller piping tips are not wide enough to press the dough through. I find that sometimes the prongs of the star tip get pressed inwards (when cleaning or pushing it into the piping bag). This makes it more difficult for the dough to move through the piping tip. You can gently encourage the prongs slightly outward, creating a larger opening to help make pressing the dough easier.
- Test Cookies: If this is your first time making this recipe, I would recommend making just a few test cookies first (3-4) to make sure that the timing, oven temperature, and dough consistency are right before making a full batch of 25.
- Oven Temperature: Oven temperatures can vary widely, and the display temperature is not always accurate. You can use a separately purchased in oven thermometer to verify the temperature. Otherwise, keep a close eye on the cookies and use visual cues to know when the cookies are done. Use the stated baking time as a guideline rather than a fixed number.
Nutrition
Calories: 36kcal | Carbohydrates: 4g | Protein: 1g | Fat: 2g | Saturated Fat: 0.1g | Sodium: 2mg | Potassium: 2mg | Fiber: 0.4g | Sugar: 3g | Calcium: 8mg | Iron: 0.2mg
