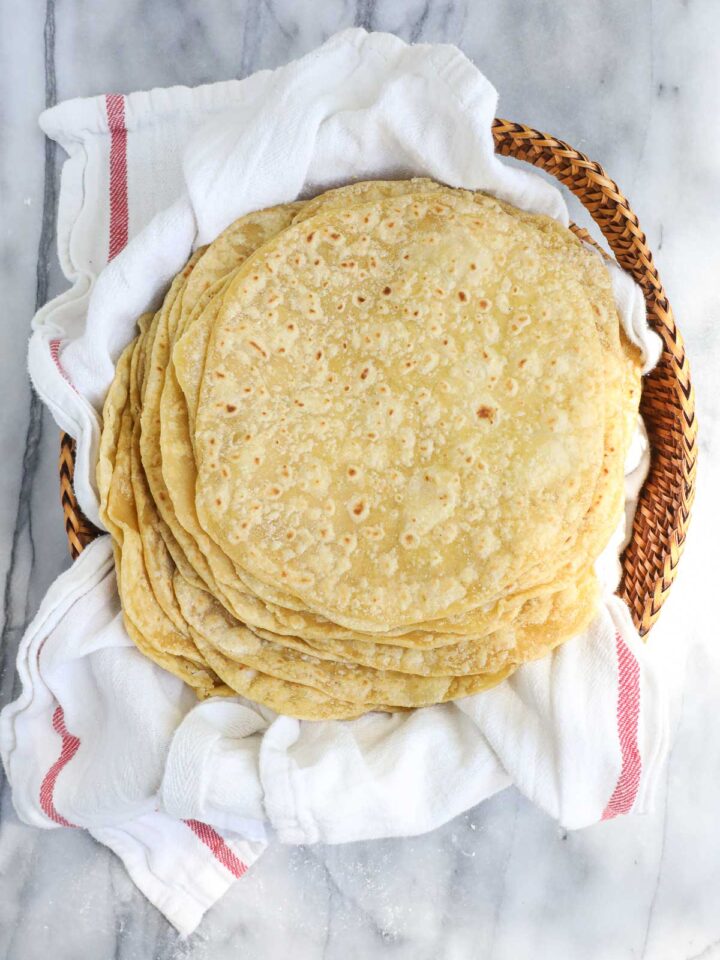
With a short rise time, Pita Bread is easy to make at home, either on the stovetop for a soft and chewy texture or in the oven to create the classic pita pocket.
Serve it with homemade Thick and Creamy Lemon Whipped Feta.

Pita bread is easy to make at home and takes less time and effort than you might think. Unlike making a typical loaf of bread, you don’t have to knead the dough for an extended period of time, and the dough only needs 1 hour to rise.
Each pita takes 1-3 minutes to bake, so you can really finish the whole process pretty quickly (you can do multiple at the same time), and it’s not totally out of the question to make these to go with dinner if you have a little extra time on your hands.
Stovetop vs. Oven
You can either make them on the stovetop or in the oven. If you make them on the stovetop, you can use a Dutch oven, cast iron pan, or griddle. When made this way, they are soft and chewy and a thousand times better than store-bought. If you make them in the oven, they are also fantastic, but instead of being super chewy, a bubble forms in the dough, creating the pita “pocket” effect.
💕 Family Friendly
It's a super family-friendly recipe and great to get kids involved in. They can roll out the balls of dough into rounds, and if you’re baking them in a Dutch oven, the kids can brush olive oil on them too. We now keep several of these in the freezer and pull them out for easy lunches for the kids with hummus and chicken or vegetables, depending on what we have on hand.
🫓 Recipe Development
I had never tried to make Pita bread at home (and never really liked store-bought - it was always dry) until a friend of ours made some along with an incredible dinner that they brought over after we brought our third baby home from the hospital a few years ago. It was SO good that once we had our feet back under us, I asked for her recipe and tried my best to replicate it. She made hers on a griddle, but since we don’t have one, I tried it in the oven on a pizza stone. They turned out really well, but they did not have the same consistency. The next time I tried it, I made them in our Dutch oven, which gave them that fantastic chewy texture.
I decided to do an experiment and make both variations at the same time: on the stovetop and in the oven. The big difference is that the ones on the stovetop are chewy and almost buttery in consistency. The ones in the oven develop the pita "pocket". They both take roughly the same amount of time. The ones on the stovetop take about 1 ½ minutes each, but you can only fit two or so in the Dutch oven at the same time. The ones in the oven on the pizza stone take 2-3 minutes each, but you can usually fit three on a pizza stone at once.
🛒 Ingredients
Below are the ingredients needed to make Homemade Pita Bread.

- Water: Use warm water to dissolve the sugar and help activate the yeast. Be sure the water is not hot or it will kill the yeast.
- Sugar: Just 2 tablespoons to help get the yeast going. The bread does not taste sweet.
- Yeast: I recommend using Rapid Rise, Fast Acting, Instant Yeast. It helps with a fast rise.
- Olive Oil: Use extra virgin olive oil. It adds fat and flavor.
- Flour: It helps to use bread flour. If you don't have bread flour you can use all-purpose flour.
- Salt: To balance flavor.
See the recipe card for full information on ingredients and quantities.

📝 How to Make Homemade Pita Bread
Below are the step-by-step instructions for how to make Homemade Pita Bread both in the oven and on the stovetop.
Note: The recipe card with instructions, ingredient list, and quantities is included further below these step-by-step photos.

Step 1. Activate the Yeast: In a large bowl combine the warm water and sugar and stir to dissolve. Add the yeast and let sit for 5 minutes until it starts to become bubbly.
Step 2. Make the Dough: Add the olive oil and stir. Add the flour and salt and stir until it forms a rough, shaggy ball. Turn out onto a lightly floured surface and knead just until it comes together into a smoother (but not perfect ball). Place in a clean bowl, cover with a thin layer of olive oil and let sit in a warm place for 1 hour to rise.

Step 3. Divide the Dough: If baking the pita bread, place a pizza stone in the oven and preheat the oven to 500°F.
After the dough has risen turn it out onto a lightly floured surface and divide the dough into 16 roughly equal pieces. Shape each piece into a round ball tucking and twisting any rough ends underneath. Cover with a dish towel and let rest for 15 minutes.

Step 4. Roll Out the Dough: Use a rolling pin to roll out a round of dough into a very thin circle. The thinner the better as they will puff up on the stovetop or in the oven on the pizza stone.

Step 5: Cook the Pitas.
Stovetop: Bring a cast iron pan, Dutch oven, or griddle to medium heat (a setting of "4" out of "10"). Brush the pita lightly with olive oil on one side only and cook for 30 seconds to 1 minute, then flip the pita over and cook for another 30 seconds to 1 minute. You may be able to fit 2-3 pitas on the pan at one time. Repeat with the remaining pitas.
Oven: Lightly dust the end of a pizza peel with flour and place the round of dough so that the edge of the dough hangs over the pizza peel by ½ inch (see the image from Step 4 above). Slide the pita round onto the pizza stone (you can likely fit 2-3 pitas in the oven at one time). Bake for 2-3 minutes. Remove carefully with tongs. Repeat with the remaining pitas.

❄️ How to Serve, Store, and Freeze
- To Serve: Serve warm or at room temperature. Dip in hummus, whipped feta, or alongside a main course, such as this Street Cart Chicken Recipe.
- To Store: Store in an airtight container or freezer bag (removing as much air as possible from the bag) for up to 2 days.
- To Freeze: Pita bread is excellent for freezing. Make a double batch and freeze any leftovers. Place in a gallon-sized bag, removing any extra air, and freeze for up to 3 months. Thaw at room temperature on the counter or overnight in the fridge. Or warm gently in the oven at 300°F or on low power in the microwave.
💖 For More Bread Recipes, You May Love These


If you tried this Homemade Pita Bread or any other recipe on my site, please leave a 🌟 star rating and let me know how it went in the 📝 comments below. I'd love to hear from you!

Homemade Pita Bread
Ingredients
- 1 ½ cups warm water
- 2 tablespoon sugar
- 1 package instant yeast
- ¼ cup olive oil plus extra for brushing on
- 3½ cups flour (490 grams)
- 1½ teaspoon salt
Instructions
Making the Dough
- In a medium mixing bowl, combine the warm water, sugar and yeast, and let sit for 5 minutes.
- Add the olive oil, flour, and salt. Using a spoon, combine until roughly the shape of a ball.
- Cover the bowl with a kitchen towel and let rise for 1 hour. Usually, I’ll leave the bowl on the kitchen counter but if it’s really cold out and therefore a bit cold in the house, I’ll put it on the back of the oven and turn the oven on so that the area is warm, which helps the dough rise.
- Punch the dough down and divide into 16 balls. Place on the counter and cover with a kitchen towel. Let rise for another 15 minutes.
On the Stovetop in a Dutch Oven, Cast Iron Pan, or Griddle
- Bring a Dutch oven, cast iron pan, or griddle to medium to medium-low heat. On my stove, this means that I set the dial to a “#4” out of “#10” for the burner. This may vary on your stove.
- Roll out one of the balls of dough to ⅛ inch thickness. It should be fairly thin. It will puff up while baking.
- Brush one side very lightly with olive oil. Place oil side down in the Dutch Oven or on a griddle. Let cook for 30 seconds to 1 minute until lightly browned. Flip and let cook for another 30 seconds to 1 minute on the other side
- On my stove I cook them for 45 seconds on each side. I set a timer so I know when to flip them and take them off. Remove and repeat with the remaining balls of dough. If you can fit more than one in the Dutch oven or on a griddle at once, add as many as can fit. Do not roll out all the balls of dough ahead of time, only roll out what can fit in the Dutch oven/griddle at one time. Otherwise, it will start to rise before you get a chance to bake it.
In the Oven on a Pizza Stone
- Place a pizza stone in the oven and preheat to 500° F.
- Roll out 2 or 3 balls of dough at a time to ⅛ inch thickness. Thinner is better since they rise while baking.
- Place the rolled-out rounds of dough on the pizza stone and bake for 2-3 minutes.
- Use a pizza peel with a tiny bit of flour on it to prevent sticking. Using tongs, slide the dough off the pizza peel onto the pizza stone in the oven. Work in batches only rolling out two to three balls of dough at a time and placing them immediately in the oven. You do not need to flip the dough or put olive oil on them, just bake them on one side only for 3 minutes.
Notes
- Water: Use warm water to dissolve the sugar and help activate the yeast. Be sure the water is not hot or it will kill the yeast.
- Yeast: I recommend using Rapid Rise, Fast Acting, Instant Yeast. It helps with a fast rise.
- Olive Oil: Use extra virgin olive oil if cooking on the stovetop. It adds fat and flavor.
- Flour: It helps to use bread flour. If you don't have bread flour you can use all-purpose flour.


Leave a Reply