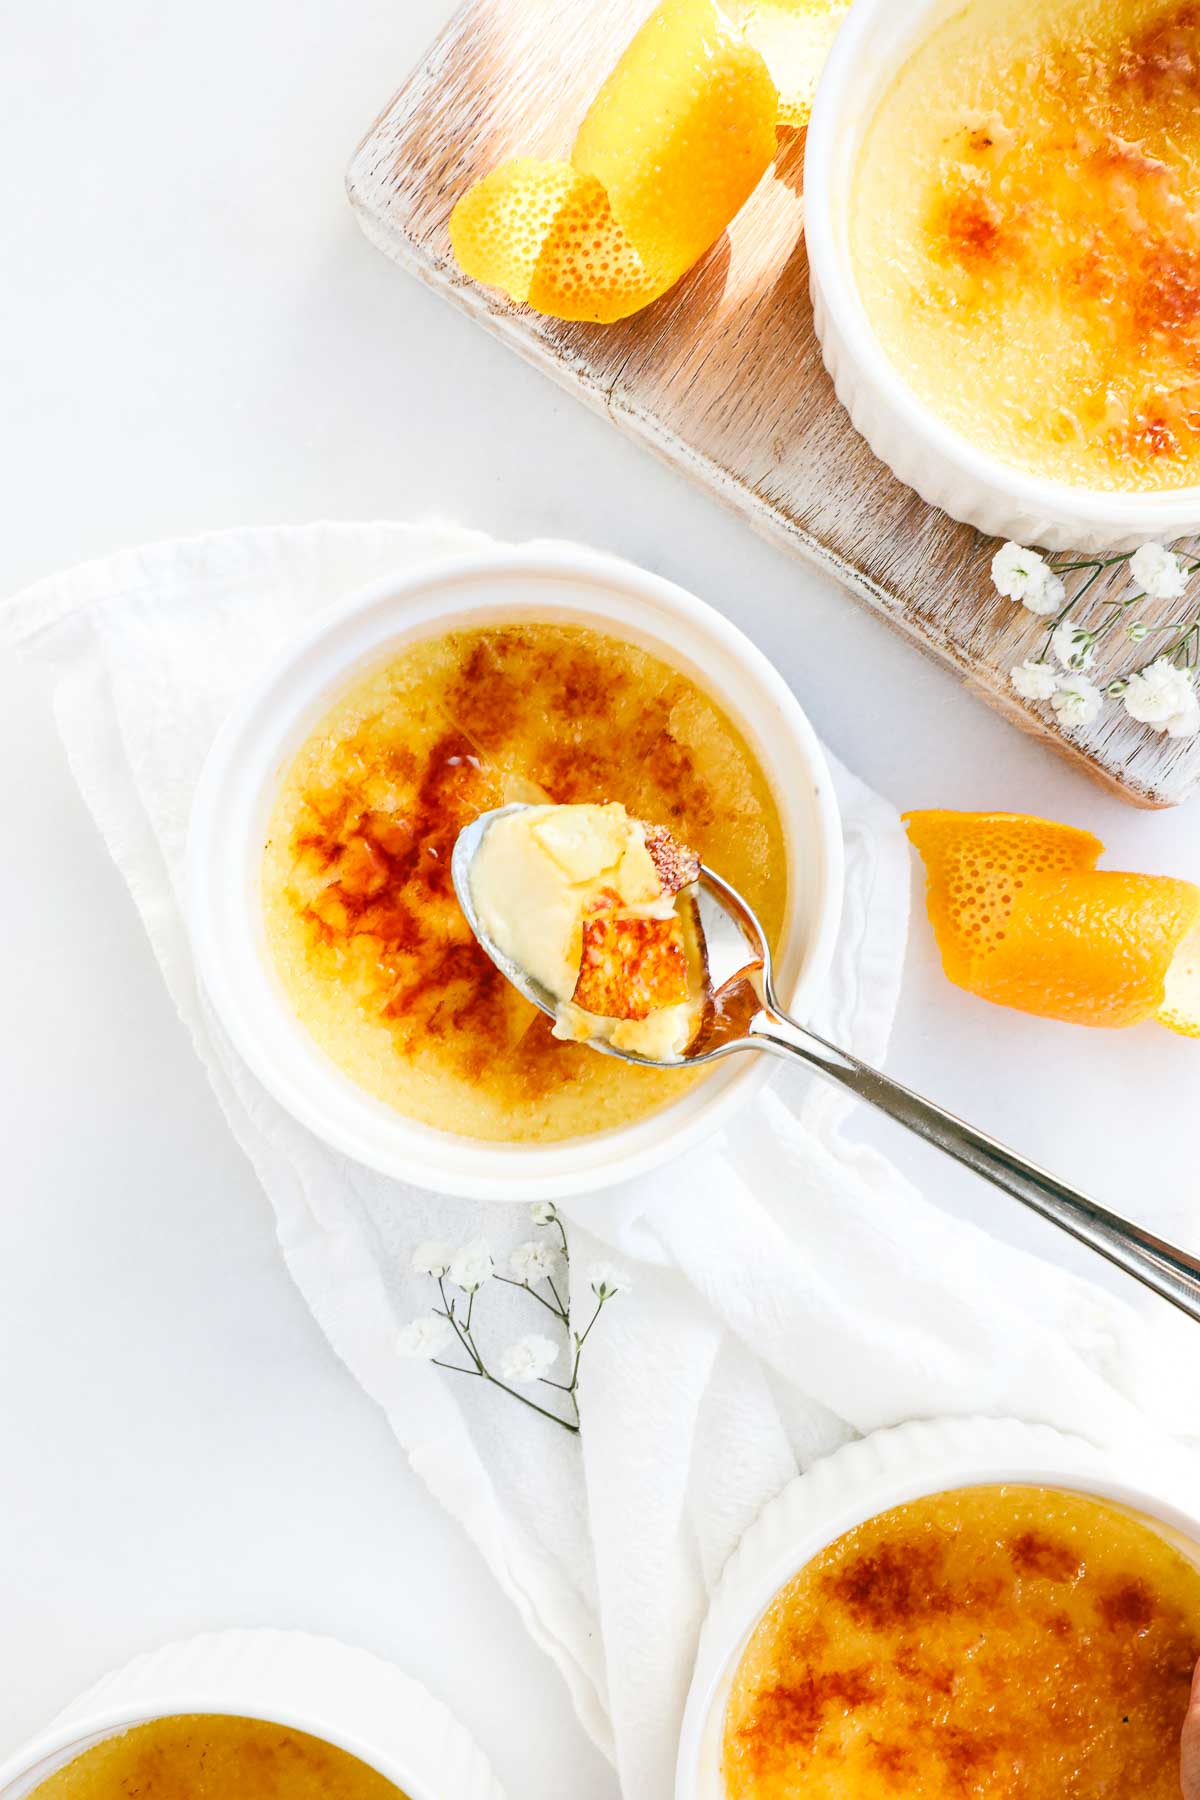
This Orange Crème Brulee is creamy, smooth, and decadent. It’s a citrus infused twist on the classic that is much easier to make than you would expect, coming together quickly for a dessert that is impressive and great for prepping ahead.
If you do not have a kitchen torch, not to worry. I've included details on how to successfully use the oven broiler.
Creme brulee can seem like an intimidating dessert, but it is much easier than you would expect. The biggest challenge to making crème brûlée, or any sort of pastry cream or custard, is tempering eggs. If you haven't done it before, you absolutely can!
Once you have a handle on whisking simmering heavy cream into egg yolks, the rest is a breeze. I will take you through the process step-by-step, pointing out tips and things that I’ve learned along the way to ensure your crème brulee turns out perfectly.
What is Tempering Eggs?
Tempering eggs is the process of slowly adding a hot liquid, often heavy cream, to eggs to raise the temperature of the eggs to prevent them from curdling. This creates a smooth and creamy texture. Tempering eggs is a technique that needs your full attention so that you’re not turning the eggs into a curdled, scrambled mess (be sure to slow down and focus on this step). But with a steady hand, it is very doable.
It’s a versatile technique, used in this case to make the custard or base of the crème brulee, but it can also be used to make the lemon curd in these Lemon Curd Cookies or the chocolate cream in this Chocolate Cream Pie.
Variations
- Vanilla Crème Brulee: Leave out the orange zest and juice and use vanilla extract, and you’ll have vanilla crème brulee.
- Vanilla Bean Crème Brûlée: This dessert goes so well with vanilla bean. Scrape out the seeds of a vanilla bean and add it to the heavy cream.
- Lemon or Grapefruit: Swap the orange zest and juice for lemon or grapefruit.
Ingredients
Below are the ingredients needed to make Orange Creme Brulee.
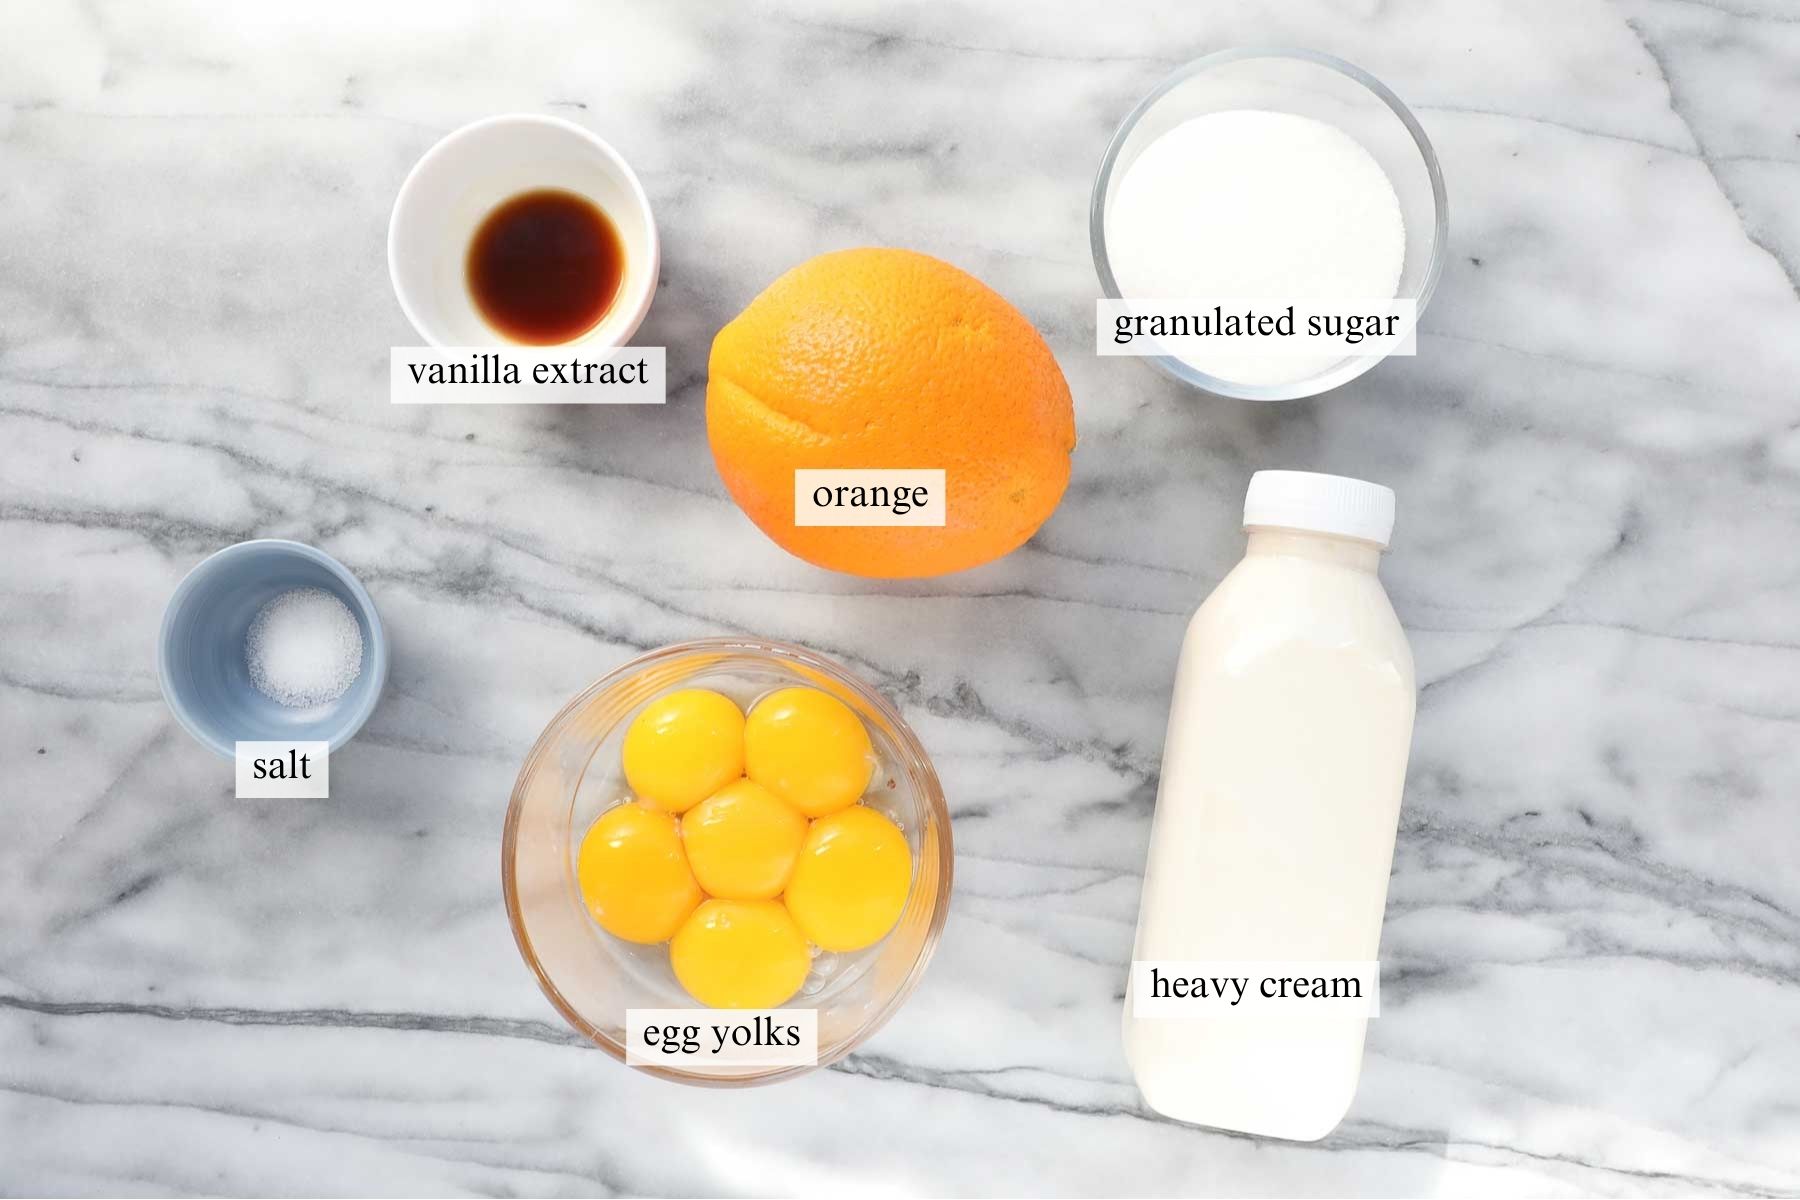
- Egg Yolks: You’ll need to separate the egg yolks from the egg whites.
- Granulated Sugar: This version of crème brulee is not overly sweet.
- Heavy Cream: Be sure to use heavy whipping cream.
- Salt: To bring out and balance flavor.
- Orange: Zest the orange first, then juice the orange. You’ll only need 2 tablespoons of orange juice, but you can juice the whole thing and then drink the leftovers. There's nothing much better than freshly squeezed orange juice!
- Vanilla Extract: Brings out flavor and creates a creamsicle-like pairing with orange zest and juice.
See the recipe card for full information on ingredients and quantities.
How to Make Orange Creme Brulee
Below are the step-by-step instructions and photos for how to make Orange Creme Brulee.
*Note: The recipe card with instructions, ingredient list, and quantities is included further below these step-by-step photos.
Prep:
- Preheat the oven to 325°F.
- Set out eight 8-oz ramekins, about 3 inches in diameter. Place them in a larger baking dish.
- Fill a tea kettle with water and bring to a boil. Remove it from the heat and set it aside.
Tip: If you do not have 8oz ramekins, that is okay. Though it is helpful if they are all roughly the same size as each other. The shallower the custard is in the ramekin, the shorter the baking time. The deeper the custard is in the ramekin, the longer the baking time. Keep an eye on them in the oven and take them out when needed.
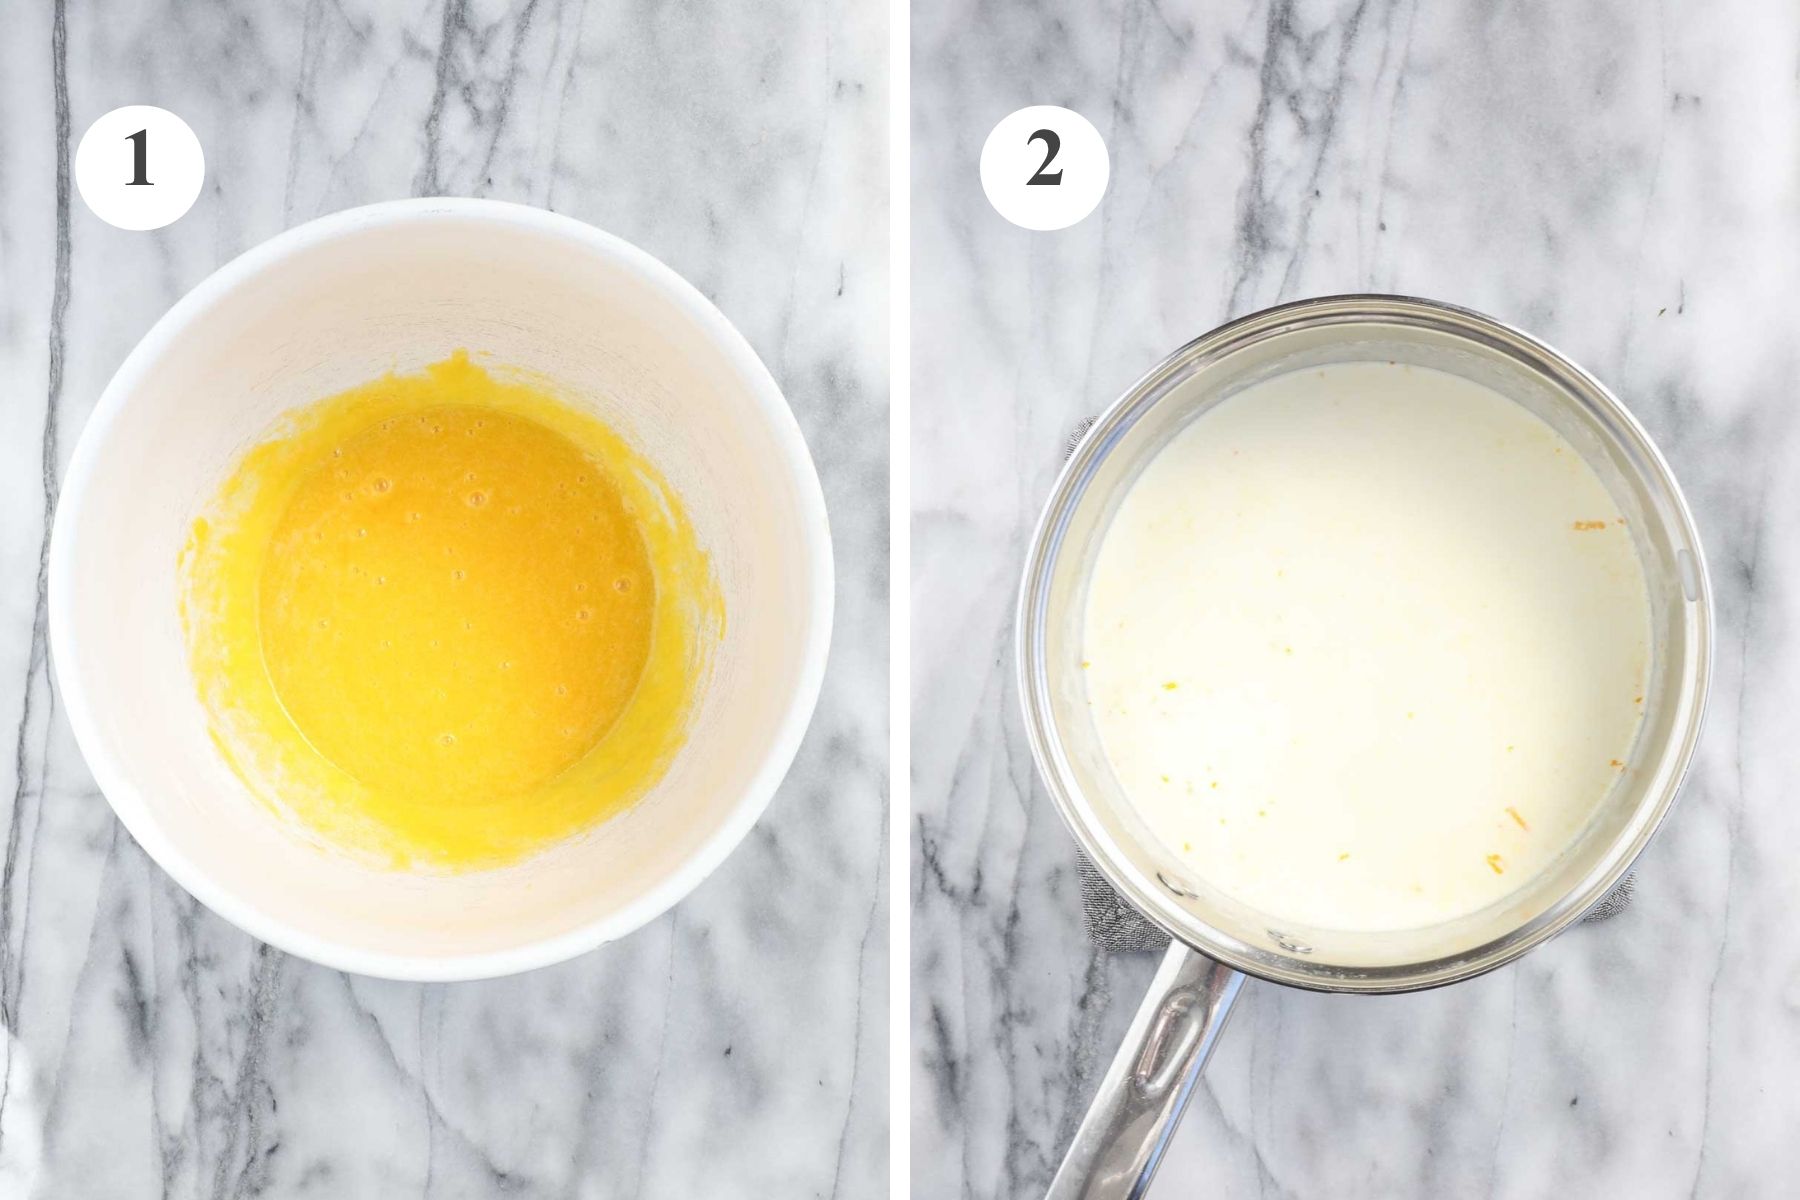
Step 1. Egg Mixture: In a medium bowl, whisk the egg yolks and granulated sugar.
Step 2. Heavy Cream Mixture: In a medium saucepan, add the heavy cream, salt, orange zest, and orange juice. Bring it to a simmer over medium heat. As soon as bubbles start to form at the edges of the saucepan, remove it from the heat and proceed to temper the eggs as described in Step 3.
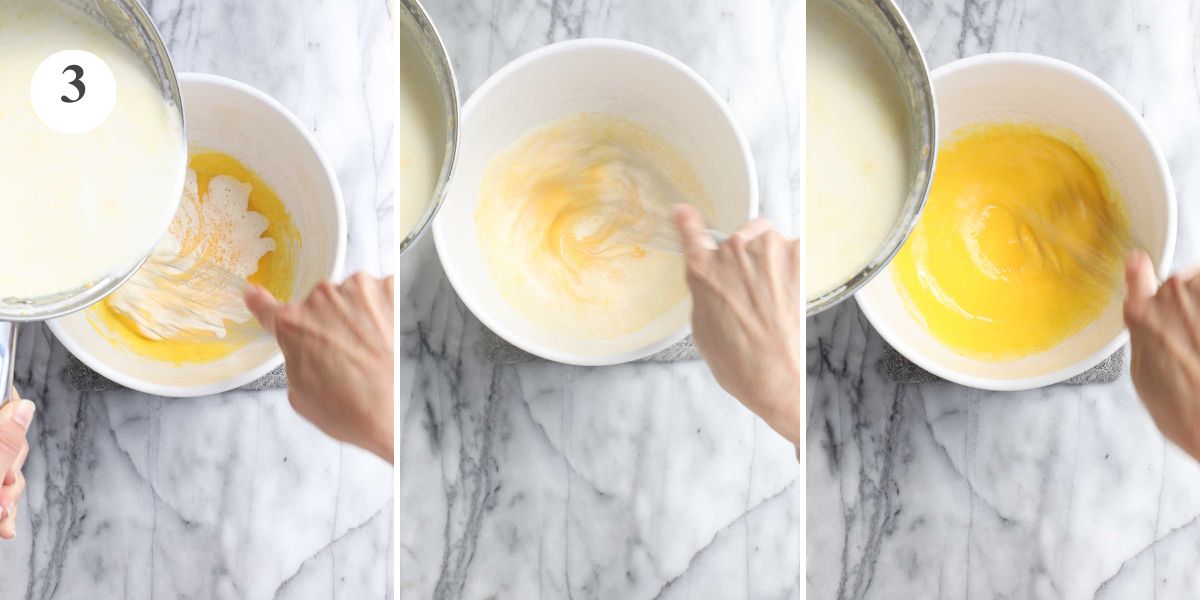
Step 3. Temper the Eggs: Slowly add about ⅓ of the heavy cream to the egg mixture while whisking the egg mixture constantly. This raises the temperature of the egg mixture while preventing the eggs from curdling. Don't worry if you see a few clumps of egg. This will be strained out later.
Tip: Be sure to continue to whisk quickly the whole time. This will help to prevent the eggs from curdling.

Step 4. Add Remaining Heavy Cream: Add the remaining hot heavy cream to the egg mixture while continuing to stir constantly.

Step 5. Strain the Custard: Strain the mixture through a fine mesh strainer to remove the orange zest and any curdled egg.
Tip: Strain the mixture into a measuring pitcher that has a spout. That way, you will have an easier time pouring the custard into each of the ramekins without spilling.
Step 6. Divide the Custard: If you have not already, ensure that the ramekins are in a larger baking dish. Use two baking dishes if you cannot fit all 8 in one dish.
Carefully pour the custard into each of the ramekins, dividing the custard evenly across the eight 8oz ramekins. The custard should come up about ⅔ the height of the ramekins.
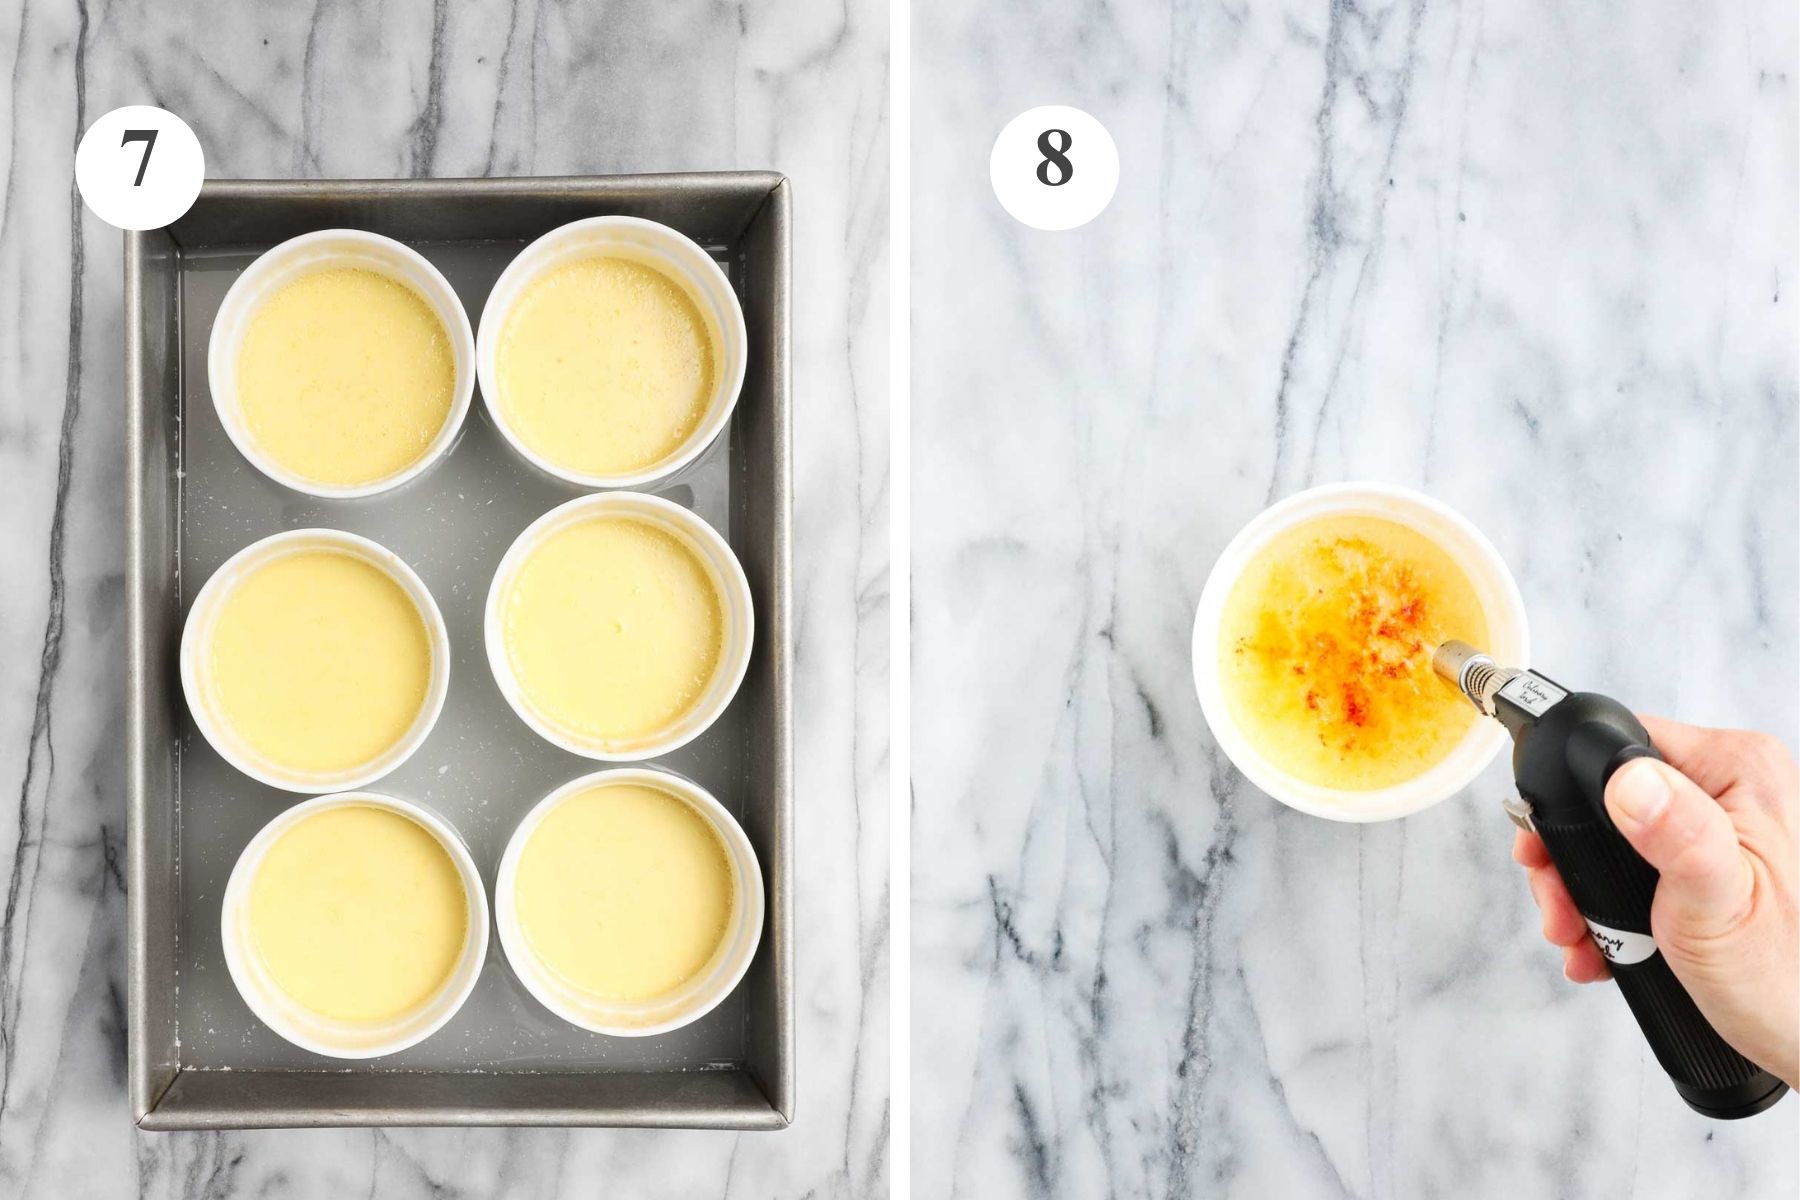
Step 7. Bake: Add hot water from the tea kettle to the baking dish to create a water bath, being careful not to pour the water into the ramekins. The water should come about halfway up the outside of the ramekins. The heat from the hot water will transfer quickly to the baking dish, so be careful handling the baking dish using oven mitts to move it from now on.
Place the baking dish into the oven, moving very slowly so that the hot water does not spill out of the baking dish or into the ramekins.
Bake for 30 minutes or until the custard is set on the outside but still loose and jiggly in the middle of each ramekin.
Tip: Use silicone oven mitts when working with the ramekins. This is an extra helpful measure to ensure that even if the oven mitts get wet from the water bath, the hot water will not permeate the oven mitts.
Step 8. Cool and Caramelize: Remove the ramekins from the water bath and set on a wire rack to cool. It helps to use silicone oven mitts. Let cool at room temperature for 40 minutes to 1 hour. Cover each ramekin and refrigerate for 3-4 hours.
To caramelize the creme brulee, add 1 teaspoon of granulated sugar to the top of each ramekin. Pick up the ramekin and tap the sides to distribute the sugar evenly across the top of the custard.
Use a kitchen torch to caramelize the sugar, moving the torch continuously so as not to burn the sugar. Pay attention to how the sugar smells as it caramelizes. If you start to smell sugar burning, stop immediately.
Tip: Wait to caramelize the creme brulee until right before serving. If it sits for too long, the sugar will soften and melt.
Using a Kitchen Torch
Kitchen Torch: When using the kitchen torch, move in a side-to-side or circular motion, paying attention to the color of the sugar (and how it smells). Watch it go from starting to melt to light brown to a deeper golden brown.
If any areas of the top are not well caramelized, you can add a touch more sugar and go over it again with the torch to get that nice golden color.
How to Caramelize Crème Brûlée Without a Kitchen Torch (Oven Broiler)
Using the Oven: While a kitchen torch is preferable, you can absolutely use the broiler in the oven to caramelize the top. Set the oven to broil. Add the sugar to the top of the ramekins and broil on high for 2 minutes with the oven rack set in the middle. Check, then add 2 more minutes if needed for a total of 4 minutes max. The tops will be nice and caramelized. Keep a close eye on it as it can go from caramelized to burned in seconds.
When using the broiler to caramelize the custard, the custard will get a little bit warmer than if using a torch. It's still delicious and does not affect the texture. It's just that the temperature will be a little bit warmer.
For More Desserts You May Love


If you've tried these 🍊 Orange Creme Brulee or any other recipe on my site, please leave a 🌟 star rating and let me know how it went in the 📝 comments below. I'd love to hear from you!

Orange Crème Brûlée
Ingredients
- 6 large egg yolks
- ½ cup granulated sugar
- 3½ cups heavy cream
- ¼ teaspoon salt
- zest 1 large orange
- 2 tablespoon orange juice freshly squeezed
- 1 teaspoon vanilla extract
Instructions
- Ramekins: For this recipe, you will need 8 ramekins, each 8oz in capacity. The ramekins used in this recipe are 3.15 x 3.15 x 1.57 inches.
- Preheat the Oven: Preheat the oven to 325°F.
- Prep Tea Kettle: Fill a tea kettle with water and bring to a boil. Once boiling, remove from heat and set aside
- Egg Yolk Mixture: In a medium bowl, whisk the egg yolks and sugar.
- Heavy Cream Mixture: In a medium saucepan, add the heavy cream, salt, orange zest and orange juice. Bring to a simmer on medium heat.
- Temper the Eggs: To temper the eggs, slowly pour roughly ⅓ of the heavy cream mixture into the egg mixture while whisking the egg mixture constantly. Add the remaining heavy cream into the egg mixture while continuing to whisk.
- Straining the Custard: Strain the custard using a fine mesh strainer to remove any pieces of egg and orange zest. This ensures a smooth texture in the crème brulee. If possible, strain it into a measuring pitcher or container with a spout for easy pouring into the ramekins.
- Divide the Custard: Place the ramekins into a large baking dish or two baking dishes if needed. Divide the custard evenly across the 8 ramekins. The custard should come up to about ⅔ the height of the ramekins.
- Water Bath: Carefully add the hot water from the tea kettle into the baking dish (but not the ramekins) so that the hot water comes about ½ inch up the sides of the ramekins. Be careful not to burn yourself with the hot water, noting that the baking dish will turn hot quickly from the hot water.
- Bake: Place the baking dishes in the oven and bake for 30 minutes. The outside of each crème brulee should be set, but the center should still be wiggly. Remove from the oven. Carefully, using a silicone oven mitt, if possible (fabric oven mitts will get wet and therefore hot very quickly), remove each ramekin and place on a wire rack to cool, approximately 1 hour.
- Chill: Cover each ramekin with plastic wrap and move to the fridge for 3-4 hours.
- Caramelize: Add 1 teaspoon of granulated sugar to the top of each ramekin. Tap the sides of the ramekins to evenly distribute the sugar across the top. Use a kitchen torch to caramelize the sugar, moving the torch constantly and being very careful to keep your hands back from the flame.Serve soon after caramelizing the top, as the sugar will soften and melt if left for too long.
Notes
- Choosing Ramekins: If you do not have 8oz ramekins, that is okay. It is helpful if they are all roughly the same size as each other. Keep an eye on them in the oven and take them out when needed. The shallower the custard is in the ramekin, the shorter the baking time. The deeper the custard is in the ramekin, the longer the baking time.
- Tempering Eggs: Be sure to continue to whisk quickly the whole time. This will help to prevent the eggs from curdling.
- Straining the Mixture: Strain the mixture into a measuring pitcher that has a spout. That way, you will have an easier time pouring the custard into each of the ramekins without spilling.
- Silicone Oven Mitts: Use silicone oven mitts when working with the ramekins. This is an extra helpful measure to ensure that even if the oven mitts get wet from the water bath, the hot water will not permeate the oven mitts.
- Caramelize Right Before Serving: Wait to caramelize the creme brulee until right before serving. If it sits for too long, the sugar will soften and melt.
- Kitchen Torch: When using the kitchen torch, move in a side-to-side or circular motion, paying attention to the color of the sugar. Watch it go from starting to melt to light brown to a deeper golden brown. If there are any areas of the top that are not well caramelized, you can add a touch more sugar and go over it again with the torch to get that nice golden color.
- Using the Oven: While a kitchen torch is preferable, you can absolutely use the broiler in the oven to caramelize the top. Set the oven to broil. Add the sugar to the top of the ramekins and broil on high for 2 minutes with the oven rack set in the middle. Check, then add 2 more minutes if needed for a total of 4 minutes max. The tops will be nice and caramelized. Keep a close eye on it as it can go from caramelized to burned in seconds. When using the broiler to caramelize the custard, the custard will get a little bit warmer than if using a torch. It's still delicious and does not affect the texture. It's just that the temperature will be a little bit warmer.

Leave a Reply