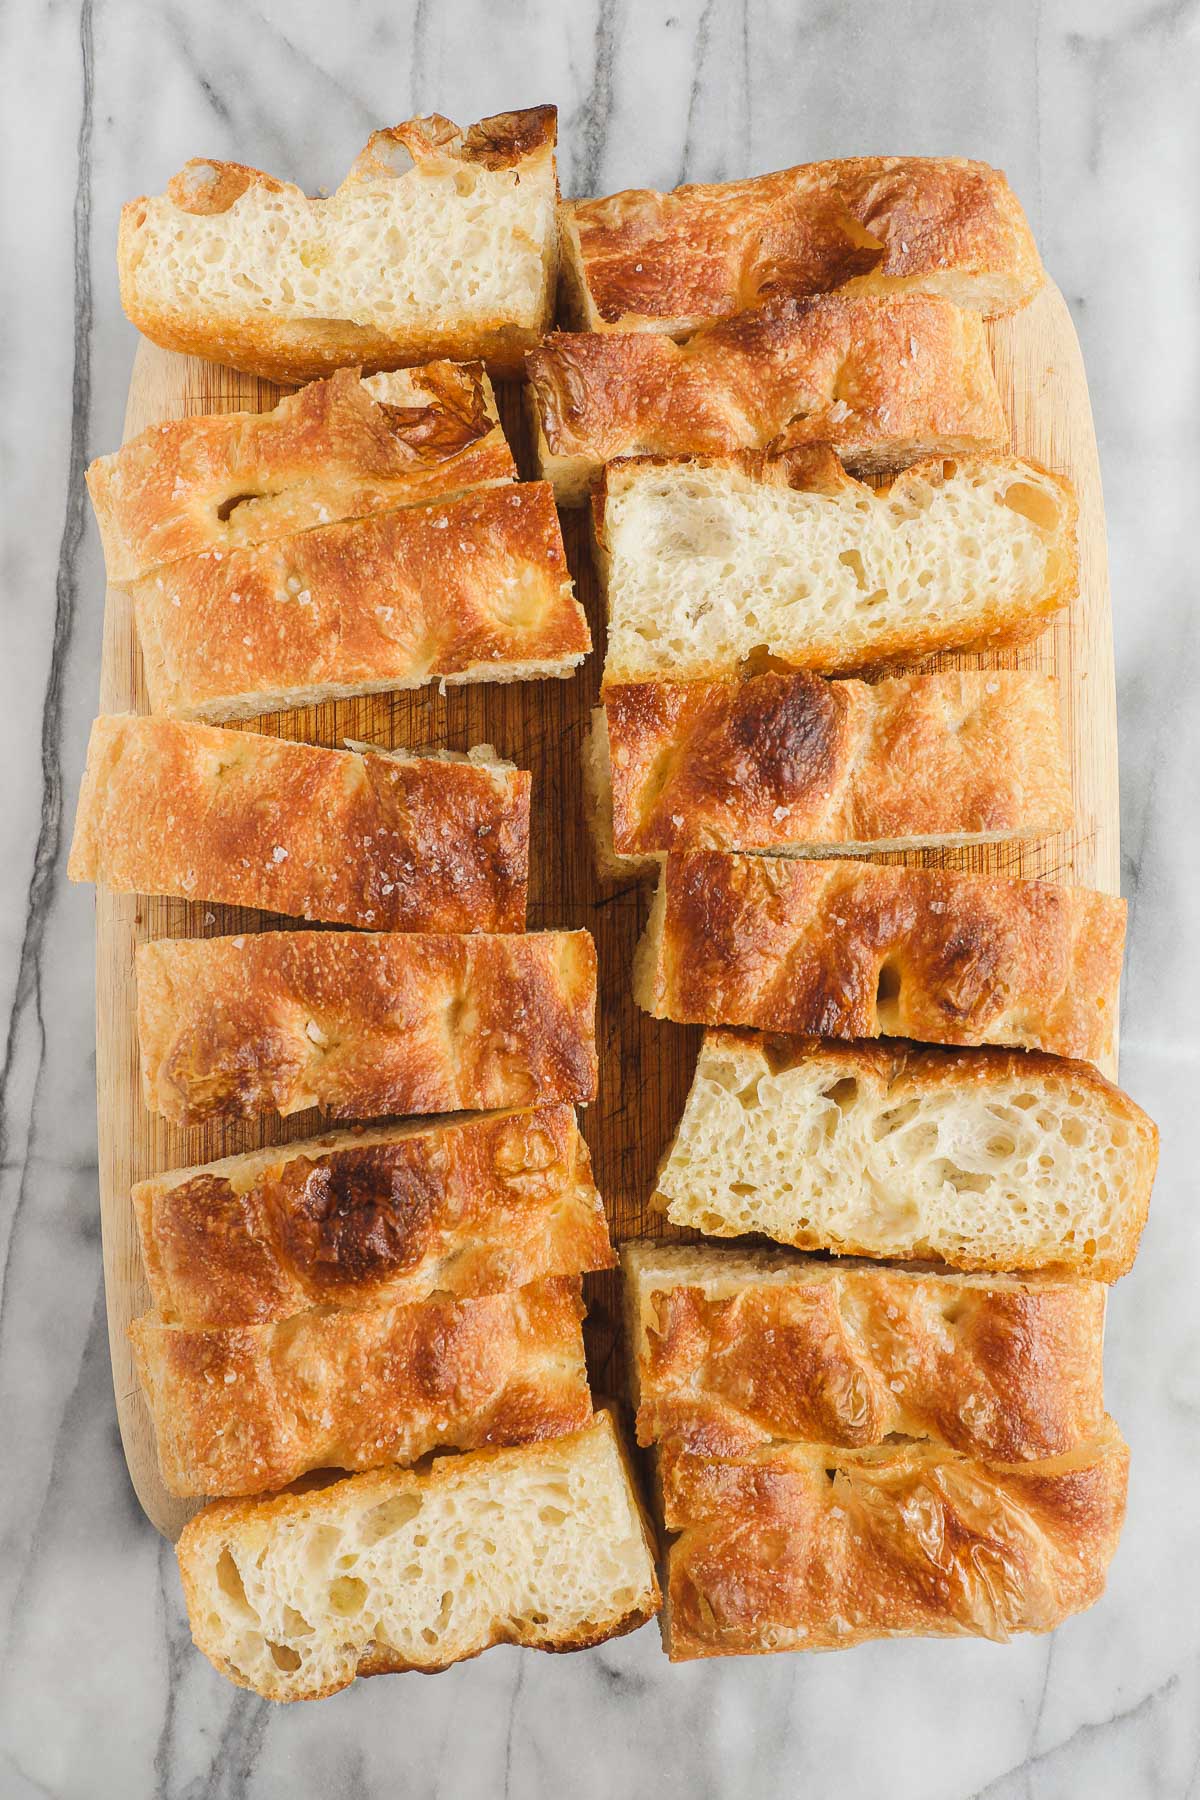
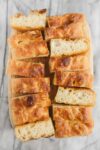
This Bubbly Focaccia is designed to have an open crumb with lots of large bubbles. It is a high-hydration dough made with high-protein bread flour, and it uses coil folds to develop strength.
⭐ Don't have a 9x13 pan? Make this Loaf Pan Focaccia instead.
High Hydration
While there are plenty of ways to make delicious focaccia, I wanted to develop a recipe that resulted in a thick, fluffy focaccia that has lots of interior holes. To accomplish that, I use a high-hydration dough. This dough is close to 100% hydration, or equal parts water and flour. I reduced the water slightly because I’ve also added olive oil to the dough.
Developing Strength
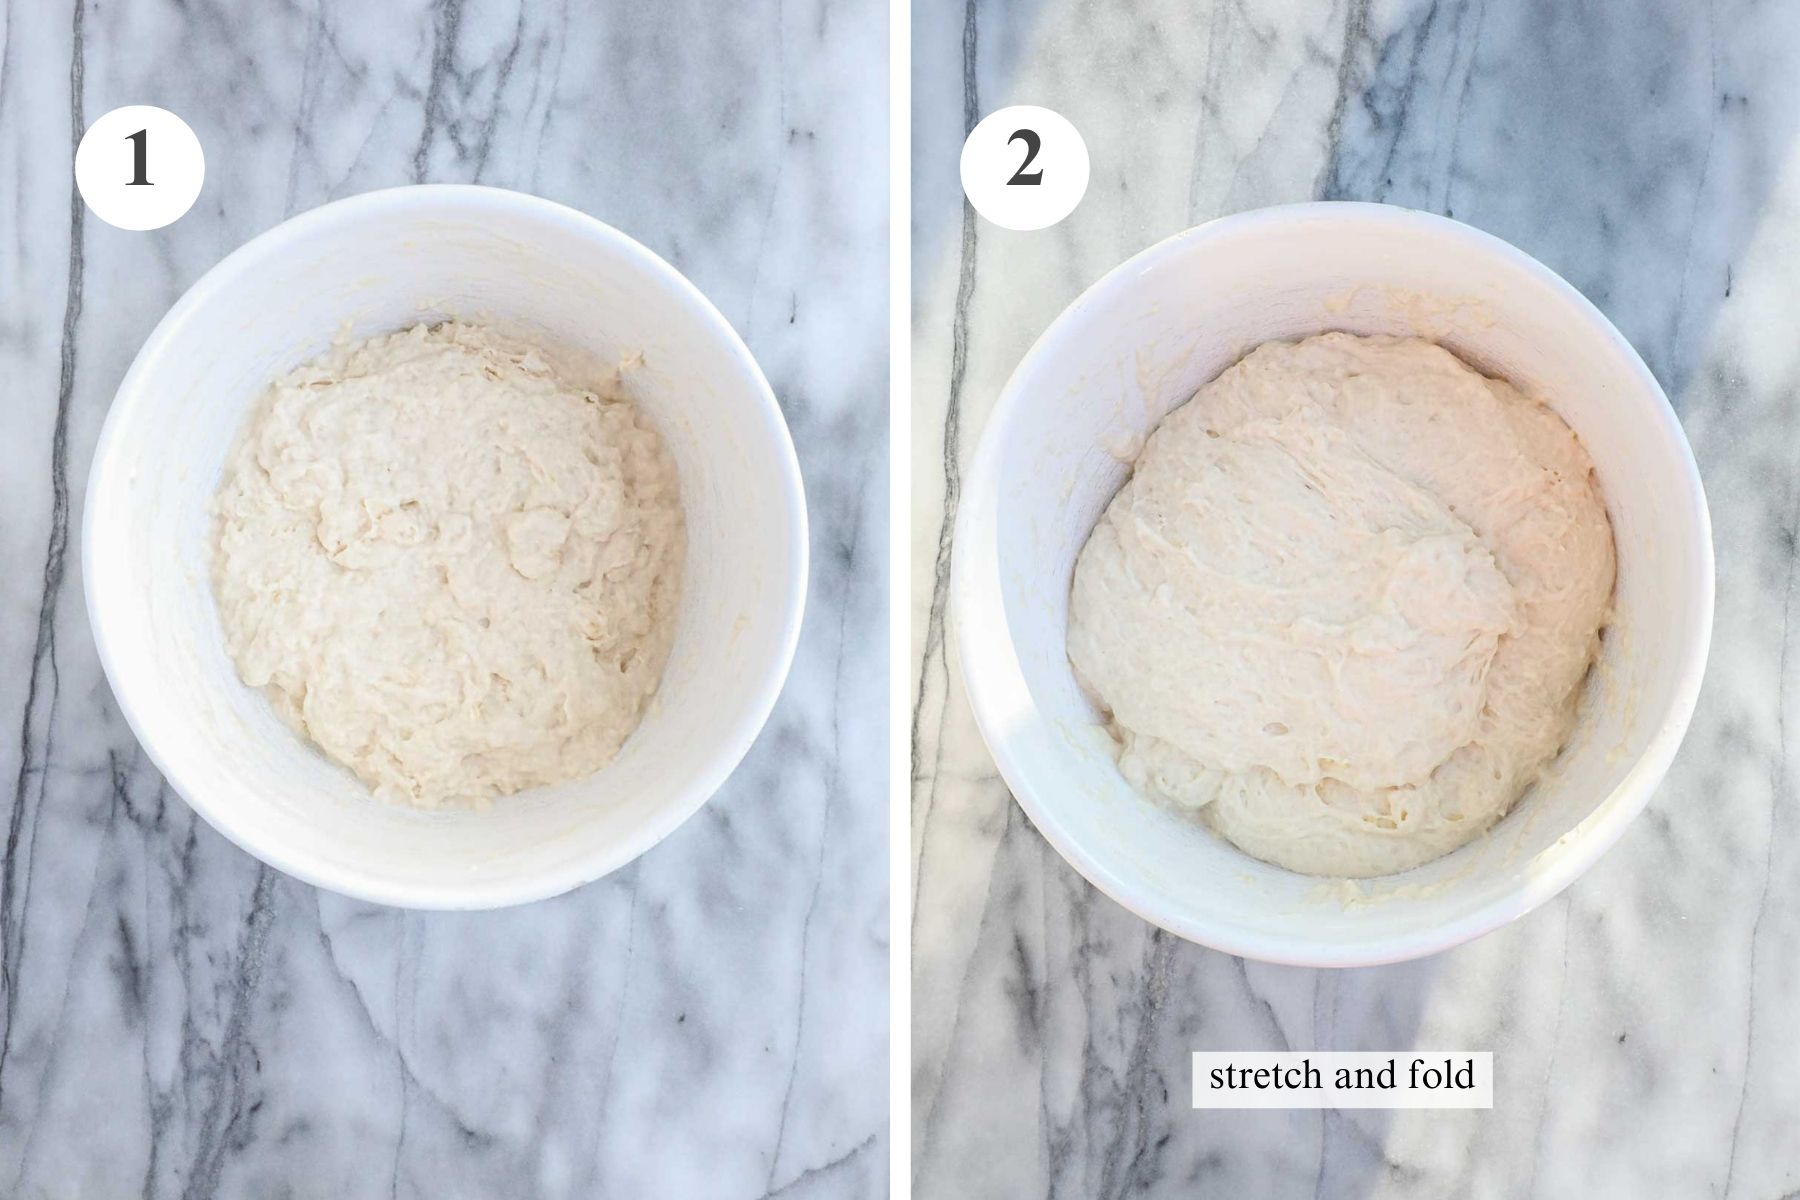
To develop strength, the dough is stretched and folded in two different ways rather than being kneaded which is not possible with such a wet dough. If you have not done a stretch and fold or coil fold before, it's easier than it sounds. For the stretch and fold, with wet hands, pull up a section of dough in the mixing bowl, let the dough stretch up, and fold it over the remaining dough in the bowl, turning the bowl and repeating several times.
The dough is so wet that it seems impossible that it could turn into anything cohesive. For this first step, the dough may feel very loose and even break a little. However, you’ll be able to feel the dough strengthen at each interval, particularly as you switch into coil folds, described in the recipe below.
Timing
This Bubbly Focaccia will take about 2 hours and 45 minutes. If you have the time, it can be started first thing in the morning, or it can be started mid-afternoon to be ready for dinner time. It’s designed to be an easier recipe that does not take the whole day or too much effort altogether.
The sets of folds are spaced out 20 minutes apart, so that you’re not continually checking upon it for hours on end. This “active” stretch fold and coil fold stage is a total of 1 hour and 20 minutes.
Sample Timing:
- 3:00pm: Mix the ingredients. Let rest 20 minutes.
- 3:20pm: Initial set of stretch and folds. Let rest 20 minutes.
- 3:40pm: First set of coil folds: Let rest 20 minutes.
- 4:00pm Second set of coil folds. Let rest 20 minutes.
- 4:20pm: Third set of coil folds, place in oiled pan, stretch to fit pan, let rise for 1 hour.
- 5:20pm: Bake.
- 5:45pm: Remove, let cool, and enjoy.
Ingredients
Below are the ingredients needed to make this Bubbly Focaccia with Open Crumb in a 9x13 Pan.

- Water: The water should be warm, but not hot.
- Honey: The honey enables the dough to rise faster.
- Yeast: The recipe calls for 7g, which is the amount in one standard packet of yeast.
- Olive Oil: Use extra virgin olive oil, which is incorporated into the dough but also drizzled in the pan and on top of the loaf before baking.
- Salt: The salt is roughly 2% of the weight of the flour, or 2 scant teaspoons.
- Bread Flour: I’ve tested this focaccia using all-purpose flour, but for this recipe I prefer using bread flour with higher protein to achieve those larger bubbles.
See the recipe card for full information on ingredients and quantities.
How to Make Bubbly Focaccia
Below are the step-by-step instructions for how to make Bubbly Focaccia with Open Crumb in a 9x13 Pan.
*Note: The recipe card with instructions, ingredient list, and quantities is included further below these step-by-step photos.
Tip: This recipe is best made by measuring the ingredients in grams. While measurements are provided in cups and teaspoons (if you don't have a scale), methods for measuring flour in a cup are not universal or standardized, which produce variable results when baking.
Step 1. Combine Ingredients: Combine the warm water and honey in a bowl and mix to dissolve. Add the yeast, olive oil, and salt, and combine. Add the bread flour and combine until all of the flour has been incorporated. Let the dough rest, covered, for 20 minutes.
Step 2. Stretch and Fold: Perform a set of stretch and folds. Rinse your hands under water and while wet, grab a portion of the dough. Pull straight up to stretch the dough and fold it over the remaining dough in the bowl. Turn the bowl slightly and repeat, continuing until all of the dough has been worked in this way, about 6-8 times. Cover and let rest for 20 minutes.
Tip: Rinsing or dipping your hands in water before handling the dough helps to prevent the dough from sticking to your hands. Do not add more flour.
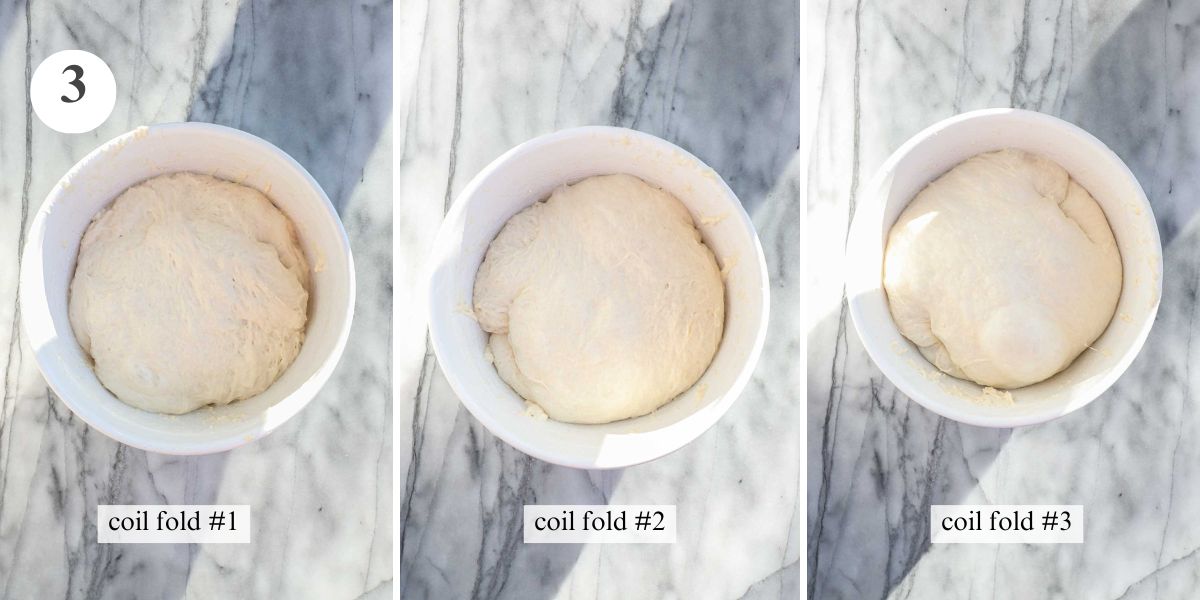
Step 3. Coil Folds: Perform 3 coil folds. With wet hands, use both hands to pick up the middle of the dough (one hand on either side). Pull the dough straight up to stretch the dough and gently release it from the bowl. Fold the dough back over itself in the bowl. Turn the bowl 90 degrees and repeat. Cover and let rest for 20 minutes.
Perform the second set of coil folds, cover and let rest for 20 minutes.
Perform the 3rd set of coil folds.
Note: You can see in the images above how after each set of coil folds the dough is strengthening. It is pretty amazing to see how the dough goes from very loose, and almost like batter (Image 1), to a cohesive round of bread dough.

Step 4. Prep the 9x13 Pan: Drizzle the bottom of a 9x13 metal pan with 1-2 tablespoons of olive oil. Use your hands or a pastry brush to also brush the sides of the pan. Place the dough in the pan.
Step 5. Stretch the Dough: With wet hands gently encourage the dough towards the sides and corners of the pan. Do this lightly. It does not need to get all the way to the edges as it will expand as it rises.
Step 6. Rise: Let the dough rise, covered for 1 hour or more if needed. Preheat the oven to 450°F 30-40 minutes before you plan to bake.
Tip: Letting the dough rise in a warm place will shorten the rise time. This can be done in front of a sunny window, on the back of a preheated oven, or in a microwave with a cup of boiling water in the microwave next to the dough (do not microwave).

Step 7. Dimple the Dough: Drizzle the top of the dough with additional olive oil. With wet hands dimple the dough pressing your fingers to the bottom of the pan. Sprinkle with flaky sea salt, if desired.
Step 8. Bake: Bake the focaccia at 450°F for 25-30 minutes. The top of the focaccia should be medium to dark golden brown to ensure that the center is fully baked.
Tip: All ovens are different, some run hotter or colder, and some take upwards of 30 minute to fully preheat (even when the oven indicates it has preheated), and some maintain their heat differently during the baking process. Watch the bread to ensure that it has the right amount of color before pulling it out.
Serving Suggestions:
- Salad: Have it with a Butternut Squash Salad with Maple Vinaigrette for a light dinner.
- Main Dish: Serve this focaccia alongside Crispy Lemon Chicken.
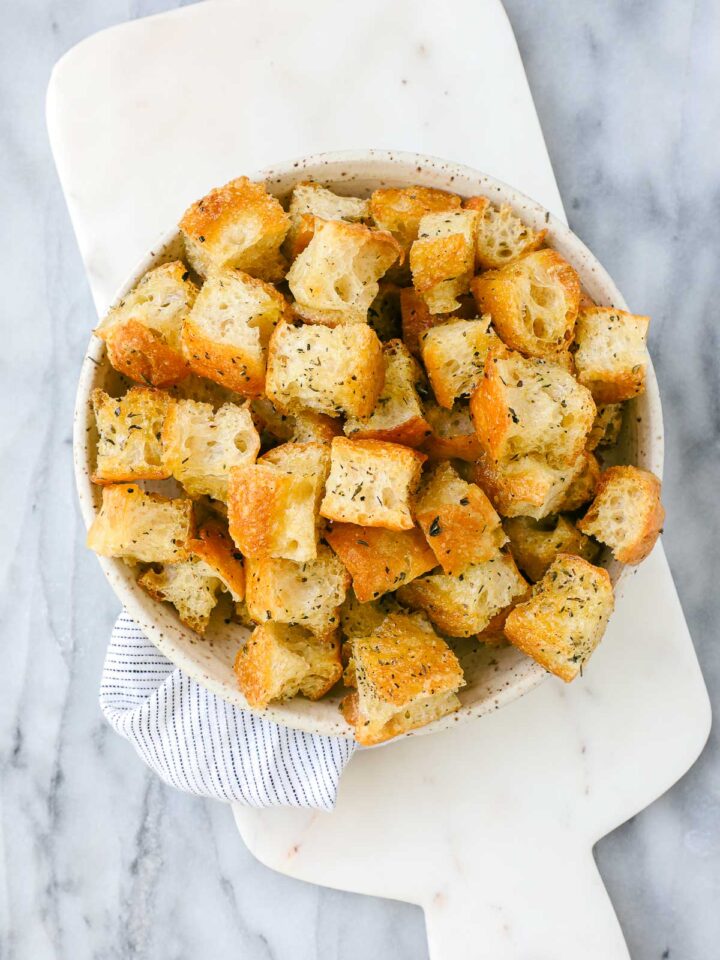
- Croutons: If you have leftovers, turn this focaccia into homemade Focaccia Croutons.
💖 If You're Interested in More Bread Recipes, You May Love These:


If you tried this Bubbly Focaccia or any other recipe on my site, please leave a 🌟 star rating and let me know how it went in the 📝 comments below. I'd love to hear from you!
Bubbly Focaccia with Open Crumb in a 9x13 Pan
Ingredients
- 425 g warm water 2 cups less 2 tablespoons
- 7 g honey 1 tsp
- 7 g instant yeast 1 standard packet
- 30 g extra virgin olive oil 2 tablespoons
- 10 g salt 2 scant teaspoons
- 455 g bread flour 3¼ cups
Instructions
- In a large bowl, add the warm water (ensure that it is not too hot) and the honey and stir to dissolve. Add the yeast, extra virgin olive oil, and salt, and stir. Add the bread flour and mix to combine until all of the flour is incorporated. This can be done with a bowl scraper, a spoon, or your hands.
- Cover the bowl and let it sit in a warm place for 20 minutes. You will do 1 set of stretch and folds and 3 sets of coil folds, each spaced out by 20 minutes.
- Do 1 set of stretch and folds. To do this, wet your hands. On one side of the bowl, grab a section of the dough and gently pull it up and fold it over the remaining dough in the bowl. Turn the bowl slightly and repeat, going around the bowl until all of the dough has been worked in this way, about 6-8 times. Cover and let rest for 20 minutes.
- Do a set of coil folds. To do this, wet your hands and using both hands (one hand on either side), pick up the middle of the dough, letting both sides stretch towards the bowl as you pull upwards. Once all of the dough has released from the bowl, fold it over onto itself. Turn the bowl 90 degrees and repeat. Cover and let rest for 20 minutes.
- Do the second set of coil folds. Cover and let rest for 20 minutes.
- Do the third set of coil folds.
- Drizzle 1-2 tablespoons of extra virgin olive oil in a 9x13 metal baking dish. Coat the bottom of the dish and use a pastry brush or your hands to coat the sides.
- Place the dough into the oiled dish. Gently stretch out the dough to encourage it towards the corners and edges. It does not need to go all the way to the edges as it will fill out the dish as it rises.
- Cover the dough and let it rise for 1 hour, or more if needed. If your kitchen is on the cooler side, it may take longer.
- 30-40 minutes before you are ready to bake, preheat the oven to 450°F.
- Drizzle the loaf lightly with olive oil. Wet your hands and press dimples into the dough, pressing all the way down. Sprinkle with flaky sea salt.
- Bake for 25-30 minutes. The loaf should be a medium to deep golden brown color on the top to ensure that it has fully baked.
Notes
- Measurements: This recipe is best made by measuring the ingredients in grams. While measurements are provided in cups and teaspoons (if you don't have a scale), methods for measuring flour in a cup are not universal or standardized, which produce variable results when baking.
- Water to Prevent Sticking: Rinsing or dipping your hands in water before handling the dough helps to prevent the dough from sticking to your hands. Do not add more flour.
- Rising: Letting the dough rise in a warm place will shorten the rise time. This can be done in front of a sunny window, on the back of a preheated oven, or in a microwave with a cup of boiling water in the microwave next to the dough (do not microwave).
- Oven Temperature: All ovens are different, some run hotter or colder, and some take upwards of 30 minutes to fully preheat (even when the oven indicates it has preheated), and some maintain their heat differently. Watch the bread to ensure that it has the right amount of color before pulling it out.
- Room for Error: There is definitely room for error with this recipe. Even if you were to not work the dough at all (and just did an initial rise, and a second rise in the pan) you will still get a very tasty airy focaccia. However, doing the stretch and folds and coil folds creates larger bubbles and a stronger structure, rather than lots of little bubbles.


Leave a Reply