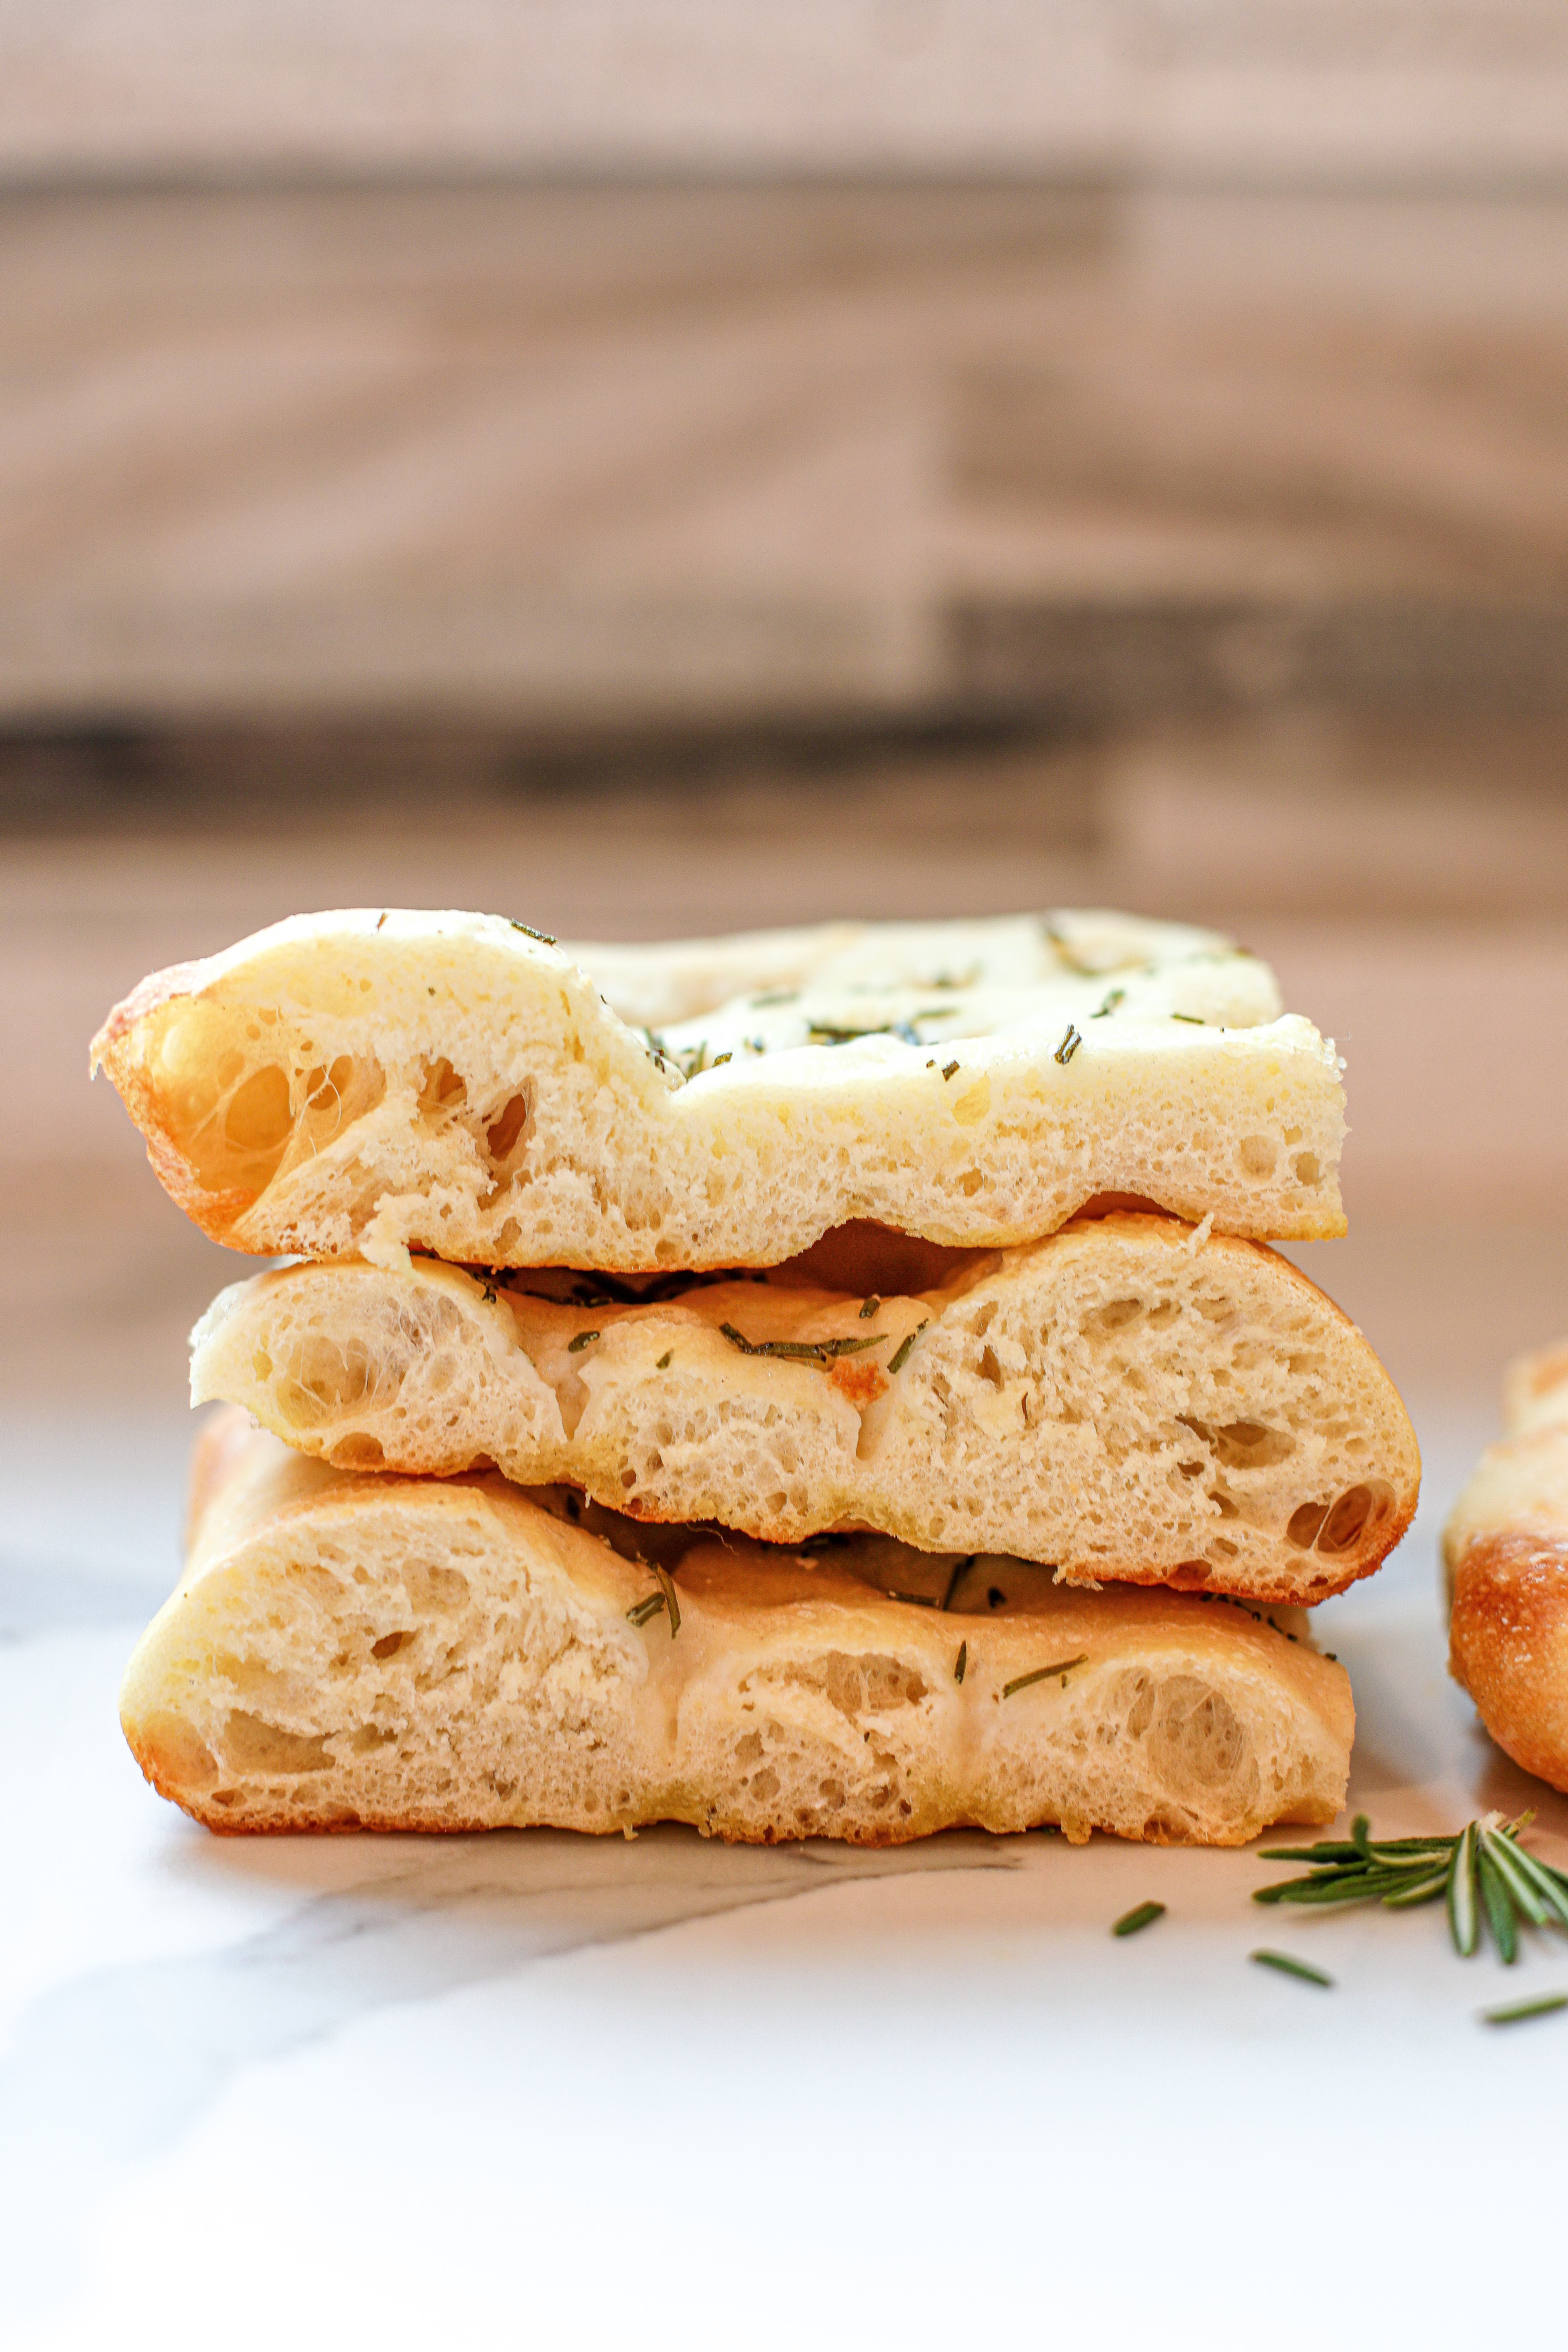
This homemade Cast Iron Focaccia with Rosemary and Sea Salt has a thick, crispy bottom with a super light and airy interior and a thin, crispy golden top. It is topped with fresh rosemary, flaky sea salt, and a drizzle of extra virgin olive oil for an herby, salty, and savory bite.
The trick is to use a wet dough and work the dough, rather than knead it (super easy - and fun) and the cast iron pan gets you that super crispy bottom!
For Focaccia in a 9x13 pan, try this Bubbly Focaccia with Open Crumb or for a small portion, this Loaf Pan Focaccia.

Focaccia is great to make as an appetizer, a side, or even as the main part of a lunch, which we love to do with our kids sometimes. You can freeze slices and then briefly reheat them in a toaster oven and lunch is ready in under 5 minutes along with some cut-up fruit or vegetables.
If I'm making focaccia for a crowd, I'll make this Sheet Pan Focaccia which is enough for eight or more people. I’ll sometimes make it along with this Grandma Pie Pizza when having friends over just in case anyone has any dietary restrictions or preferences (i.e. an option without cheese or sauce).
If thinking about crispy olive oil focaccia has you craving pizza, you may like this Potato and Rosemary Pizza which uses Neapolitan Poolish Pizza Dough, or this Broccolini Pizza with the best white wine tomato sauce.
Jump to:
- 💡 Recipe Inspiration
- 🌟 Why You’ll Love This Recipe
- 📖 About the Dough
- ⚖️ Measuring In Grams
- 📝 Ingredients
- Variations:
- How to make Cast Iron Focaccia with Rosemary and Sea Salt
- 🍴 How to Store, Reheat, and Serve
- 📋 Cast Iron Focaccia FAQs
- For More Bread or Pizza Recipes, You May Love These:
- Cast Iron Focaccia with Rosemary and Sea Salt
💡 Recipe Inspiration
This focaccia recipe is inspired by the focaccia served at an Italian family-style restaurant in the town where I grew up. We went to this restaurant a handful of times when I was younger, and I even got to go once for my birthday. They served enormous family-sized platters. They were so big that we would order 3 platters (usually 2 pastas and 1 chicken) for our family of 7, and there would be leftovers.
Before they brought over the large platters, they would carry over enormous trays of focaccia. I remember it being so crispy, but so light and fluffy and so olive oily. The restaurant has long since closed, and I don’t think I’ve had as good a slice of focaccia since.
🌟 Why You’ll Love This Recipe
Crispy: The bottom crust gets so crispy because it is cooked in olive oil in a cast iron skillet. The bottom portion of the dough gets fried in the hot oil for a super crunchy bottom crust.
Light and Airy: The middle of the dough is super light and airy. It is made with a very wet dough.
Flavorful: The combination of extra virgin olive oil, sprinkled with fresh rosemary and sea salt packs a big flavorful punch.
📖 About the Dough
The dough to make this focaccia is designed to be a very wet dough with 72% hydration. The hydration level is the ratio of water to flour. The focaccia dough uses a combination of 00 flour and bread flour. 00 flour is flour that has been ground to a 00 level, the finest level, rather than a level of 0, 1, or 2 (the highest level). Bread flour has a higher protein content than all-purpose flour.
Both 00 flour and bread flour are available at many regular grocery stores, Whole Foods, Costco, and Target. The most commonly found brand is King Arthur, but I also love an Italian brand called Caputo.
⚖️ Measuring In Grams
I rarely write recipes that require using a kitchen scale and measuring in grams, but bread is one of the few places where it can really matter. Not everyone has a kitchen scale, and it can seem a bit intimidating to use one. However, when it comes to bread, it is important to be precise to get the right outcome (not much is better than really good homemade bread).
I recommend using a kitchen scale here and weighing your ingredients in grams.
📝 Ingredients
Below are the ingredients needed to make Cast Iron Focaccia with Rosemary and Sea Salt.

- Water: The water is heated to a warm room temperature. Be sure it is not too hot or it will kill the yeast.
- Honey: Any type of honey will do, this adds a subtle sweetness.
- Yeast: Use instant yeast. One packet of yeast is roughly 7 grams, this recipe calls for 5 grams, slightly less than 1 packet.
- Extra Virgin Olive Oil: The type of olive oil you choose will impact the overall flavor of the focaccia. Be sure to choose extra-virgin olive oil, not light or regular. I prefer Spanish olive oil, and I love the versions found at Trader Joe’s and Costco.
- 00 flour: Finely ground flour. King Arthur makes 00 flour which can be found at major grocery stores, but I also like Caputo which is an Italian brand.
- Bread Flour: This has a higher protein content than all-purpose flour for a chewier crust.
- Salt: Brings out flavor.
- Rosemary: Use fresh rosemary, finely mince the needles, and sprinkle on top of the focaccia. You can add some before and after baking. Sprinkling some after baking adds a nice bright, fresh color to the top.
- Flaky Sea Salt: For sprinkling.
See the recipe card for full information on ingredients and quantities.
Variations:
Flour: If you do not have 00 flour or bread flour (or you don’t plan to use it frequently and don’t want to make a separate purchase) you can absolutely use all-purpose flour.
Toppings: You can use any fresh herbs that you like. I often pick a little of everything from our herb garden in the summer and sprinkle it all on top, either before or after baking. You can also leave off the rosemary or the herbs on top.
How to make Cast Iron Focaccia with Rosemary and Sea Salt
Below are the step-by-step instructions and photos for how to make Cast Iron Focaccia with Rosemary and Sea Salt.
Note: The recipe card with instructions, ingredient list, and quantities is included further below these step-by-step photos.

Step 1. Water, Honey, and Yeast: Warm the water in a large mixing bowl in the microwave for about 30 seconds. The water should be warm, but not hot. Add the honey and stir to dissolve. Add the yeast and let it sit for 5-10 minutes until slightly bubbly or foamy.
Tip: If the water is too hot, it will kill the yeast, and the dough will not rise. Be sure it is at a warm temperature (but not hot).
Steps 2 and 3: Add the Olive Oil, Flours, and Salt: Add the extra virgin olive oil and stir. Add the 00 flour, bread flour, and salt, and combine until it forms a wet dough.

Steps 4 and 5: Work the Dough: Work the dough (this is instead of kneading) using a flick and scoop method. Gather the dough in your hands and while still holding a part of the dough (i.e., don't entirely let go of it), flick a portion of it onto the counter or clean work surface (Step 4). It should make a loud smacking noise.
Tip: This is similar to a French method of kneading dough called the French Fold Method, or the Bertinet Method, or sometimes called the Slap and Fold Method.

Then scoop up the dough in your hand (Step 5). Repeat this flick and scoop method for 10 minutes to work the dough.
Tip: Do not add any flour or oil to the dough or the counter. This will change the hydration of the dough impacting how light and fluffy it is when it bakes. Your hands and the counter will get sticky. That's okay.
Stand Mixer: This can also be done in a stand mixer, but you'll need to double the recipe to ensure there's enough dough to work (otherwise it may all just end up on the sides of the bowl). Assemble the dough in the bowl of a stand mixer. Start at low speed and increase slightly, periodically scraping down the sides of the bowl, about 10 minutes.

Step 6: First Rise (1 of 2): Shape the dough into a round ball and place it in a large mixing bowl. Drizzle a tablespoon of olive oil on top of the dough to coat the top and prevent it from drying out. Cover with plastic wrap and let the dough rise in a warm place for 1-2 hours or until doubled.
Tip: Use an extra-large bowl for this rise. If you use a small bowl, the dough may rise so much that it touches the plastic wrap. Since it's a very wet dough, it will stick to the plastic wrap and need to be scraped off. To avoid this, use a large bowl.

Step 7. Second Rise (2 of 2): Add 3 tablespoons of olive oil to the bottom of the skillet. Add the dough and gently press the dough from the center outwards, stretching the dough so that it reaches the edges of the pan. Allow the dough to rise for 40 minutes to 1 hour in a warm place.

Step 8. Bake: Using your fingers, gently press dimples into the dough, pressing all the way to the bottom. Drizzle the entire surface of the dough with extra virgin olive oil and sprinkle with rosemary and flaky sea salt.
Bake in the cast-iron skillet for 20 minutes at 425°F or until golden brown.
In the third picture above, I flipped the focaccia upside down after baking so that you can see how crispy the bottom crust gets after baking it in the cast iron pan.

🍴 How to Store, Reheat, and Serve
- To Store: Place in an airtight container or plastic bag and freeze for up to 3 months.
- To Reheat: Warm in the oven at 400°F for 8-10 minutes or use a toaster oven if you have one.
- To Serve: Serve drizzled with a little bit of olive oil and fresh herbs as the main part of a smaller lunch with cut-up fruit or vegetables, or as a side dish alongside:
- Soup: Roasted Tomato and Garlic Soup
- Salads: Spanish Salad
- Pasta: Pasta with Pancetta and Peas
- Main Dish: Crispy Lemon Chicken Cutlets
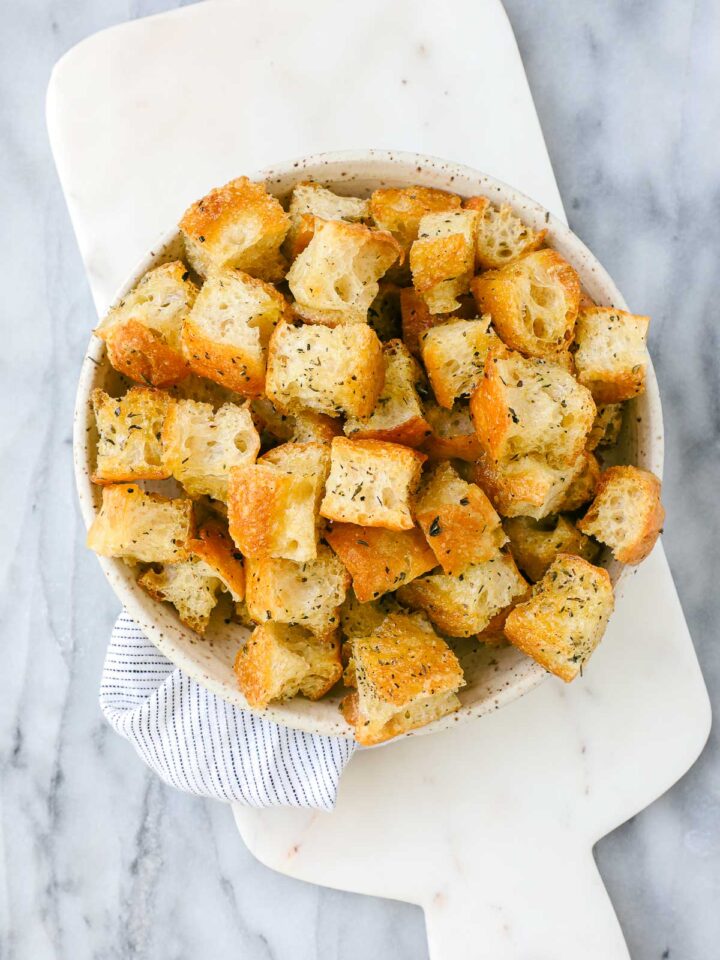
- Leftovers: Turn leftovers into homemade Focaccia Croutons.
📋 Cast Iron Focaccia FAQs
Yes, you can make the dough one day in advance. Work (knead) the dough according to the recipe, place it in a large mixing bowl, and let it rise in the fridge overnight or up to 24 hours. If you want to make it ahead by more than 1 day, I recommend baking the focaccia ahead of time and freezing the slices. Reheat them in the oven or a toaster oven before serving.
Cut slices of focaccia and store them in a freezer-safe bag, removing as much air from the bag as possible. Reheat in the oven.
I would not recommend it unless you plan to double the recipe. It’s a very wet dough and it’s also a small dough, only enough to fit in one cast iron pan. If you were to try to make it in a stand mixer, the dough would likely get all caught up in the dough hook and may not knead sufficiently.
You can use all different types of pans for focaccia. If you use a cast iron skillet you are more likely to get a deep golden crispy bottom crust when you coat the bottom of the pan with olive oil. I also like to use a sheet pan to make focaccia with this Sheet Pan Focaccia recipe.
Absolutely, baking bread or this focaccia in cast iron pan or skillet gives the bottom a super crispy crust while allowing the middle to be light and airy.
Of course, tailor the recipe to your preference or what you have available. Just skip topping the focaccia with the rosemary and sea salt, but I'd recommend adding that drizzle of olive oil!
For More Bread or Pizza Recipes, You May Love These:


If you've tried this Cast Iron Focaccia with Rosemary and Sea Salt Recipe or any other recipe on my website, please leave a 🌟 star rating and let me know how it went in the 📝 comments below. I'd love to hear from you!

Cast Iron Focaccia with Rosemary and Sea Salt
Ingredients
- 230 grams water
- 10 grams honey
- 5 grams instant yeast
- 20 grams extra vigin olive oil
- 190 grams 00 flour
- 130 grams bread flour
- 7 grams salt
- 2 sprigs fresh rosemary
- flaky sea salt for sprinkling
Instructions
- Add the water to a large mixing bowl. Microwave for 30 seconds or just until warm, but not hot. Add the honey and stir to dissolve. Add the yeast. Let sit for 5-10 minutes until it starts to bubble.
- Add the extra virgin olive oil and stir. Add the 00 flour, bread flour, and salt and combine. The dough will be very wet.
- Work the dough for 10 minutes using what I call the flick and scoop method. This is similar to the French Fold Method, sometimes called the Bertinet Method or Slap and Fold. It’s easier than it may seem. Pick up the wet dough and while still holding the dough flick or slap the other half of the dough (not in your hand) onto the counter. See the photos in the post above for more details. Scoop up the dough and again slap it on the counter or a clean work surface. Repeat for 10 minutes. Do not flour or oil the work surface while kneading. Your hands and the counter will get sticky.
- Shape the dough into a round ball and place it back in the large mixing bowl. Cover it with 1 tablespoon of extra virgin olive oil, and cover it with plastic wrap. Be sure to use a large bowl. If the dough rises to meet the plastic, it will stick and need to be scraped off. There should be plenty of room to allow the dough to rise.
- Allow the dough to rise in a warm place until roughly doubled in size 1-2 hours.
- Preheat the oven to 425°F.
- Add 3 tablespoons of extra virgin olive oil to a 10-inch round cast iron pan. Add the dough to the pan. Gently spread the dough with your fingers from the center outwards to stretch to the edges of the cast iron pan. Allow to rise for 40 minutes. If you are using a different-sized pan, you may need to adjust the baking time.
- Press dimples into the top of the dough. Drizzle with additional olive oil, and top with flaky sea salt and rosemary.
- Bake at 425°F for 20 minutes or until the top becomes a deep golden brown in color.


Leave a Reply