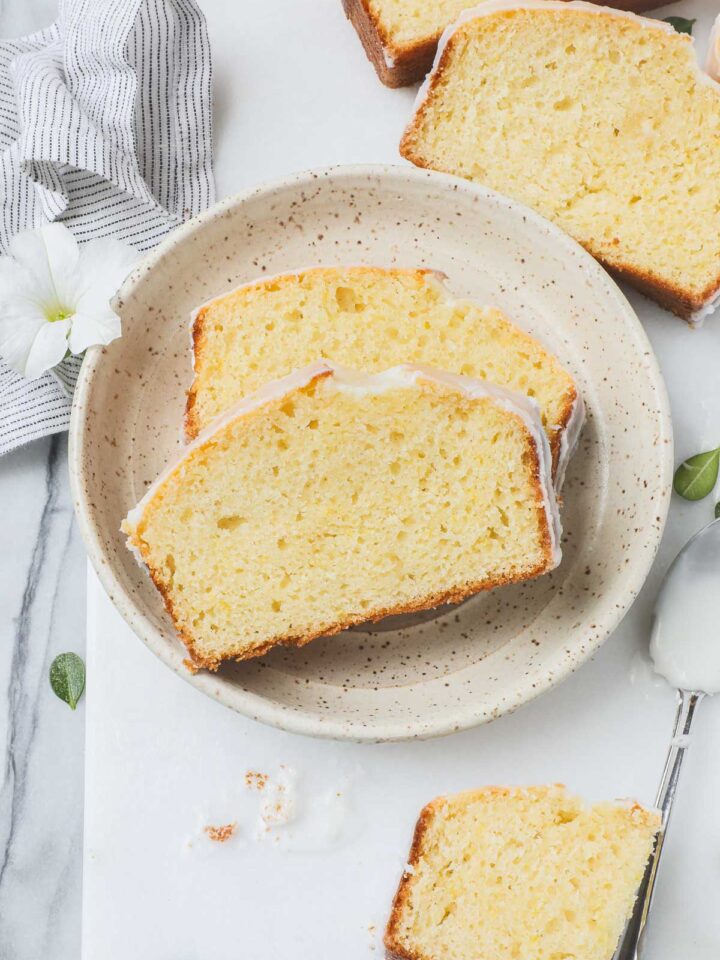
In this recipe for Buttermilk Biscuits Without Shortening, the biscuits are made by using butter and buttermilk instead of shortening. This super easy recipe skips the very cold butter and focuses instead on adding a few easy folds to the dough to create those flaky layers.

The key to making buttery soft biscuits is to keep the thickness of the dough and the baking time in balance. Baking for even one minute too long is enough to give you dry biscuits. Keep the dough nice and thick and pay super close attention to the baking time.
Though the vast majority of recipes require very cold butter, you don't need to use cold butter nor do you need to work into the flour until you get pea-sized clumps. Softened butter (not melted) works just fine. More on this below.
These biscuits are great for breakfast or as a side with a large meal or a salad. Or try this Loaf Pan Cornbread, Pull Apart Dinner Rolls, or these Pretzel Slide Buns for a tasty alternative.
Jump to:
🌟Why You'll Love This Recipe
No Shortening: There is no shortening in this recipe, just butter.
Flaky Layers Without the Work: This recipe creates flaky layers by folding flaky layers into the dough with your hands. It takes all of 1 minute, nothing fancy.
Quick and Easy: It takes 10 minutes of prep time and can be made in one bowl with simple household tools (bowl, spoon & knife, baking sheet).
Creating Flaky Layers
Cold Butter Is Not Necessary: You can create layers through folding and avoid the hassle of cold butter, frozen butter, grated frozen butter, pea-sized bits of butter, or any other small-shaped low-temperature butter.
This is contrary to everything that you will read about biscuits. If you work in a restaurant or pride yourself on the best biscuits ever, working with cold butter can potentially help create steam to get extra flaky layers. But, like with making pie crust, if you’re making these at home, it doesn’t make enough of a difference. For me, it’s not worth the extra time or effort.
I have done it both ways and see no difference between using cold butter that you dice into small pieces and mix with the flour until you get pea-sized amounts and butter that is softened in the microwave (not melted) and incorporated into dough that has been folded into layers.
Laminating The Dough
Layers Through Folding: There is a simple trick to creating flaky layers in biscuits - it's simply folding layers into the dough with your hands (no rolling pin).
Layers are folded into the dough by pressing the dough out with your fingers and folding the top third of the dough down and the bottom third of the dough up (as you would when folding a letter to send in the mail) This is called laminating and it is a technique done when making croissants.
🛒 Ingredients
Below are the ingredients needed to make Buttermilk Biscuits Without Shortening.

- Butter: Use salted butter. If you are using unsalted butter, increase the added salt by ½ tsp.
- Buttermilk: The acid in buttermilk reacts with the leaveners helping the biscuits rise.
- Egg: Use 1 large egg.
- Flour: Use all-purpose unbleached flour.
- Baking Powder & Baking Soda: For leavening. Check to make sure that they have not expired.
- Salt: To bring out flavor.
- Sugar: Just a small amount for a subtle sweetness.
See the recipe card further below for full information on ingredients and quantities.
📝 How to Make Buttermilk Biscuits Without Shortening
Below are the step-by-step instructions for how to make Buttermilk Biscuits Without Shortening.
Note: The recipe card with instructions, ingredient list, and quantities is included further below these step-by-step photos.

Step 1. Preheat the oven to 375°F. In a large bowl combine the softened butter, buttermilk, and egg. The butter should stay in large clumps while mixing the wet ingredients. I take a large mixing spoon and mix the egg and buttermilk and mash the butter into a few large pieces.
Expert Tip: If you have not softened your butter to room temperature ahead of time you can add it to a large empty microwavable mixing bowl and microwave it at 40% power for 45 seconds to 1 minute. Be sure not to melt the butter.
Step 2. Add 2 cups flour, baking powder, baking soda, salt, and sugar and combine into a rough and fairly wet dough.
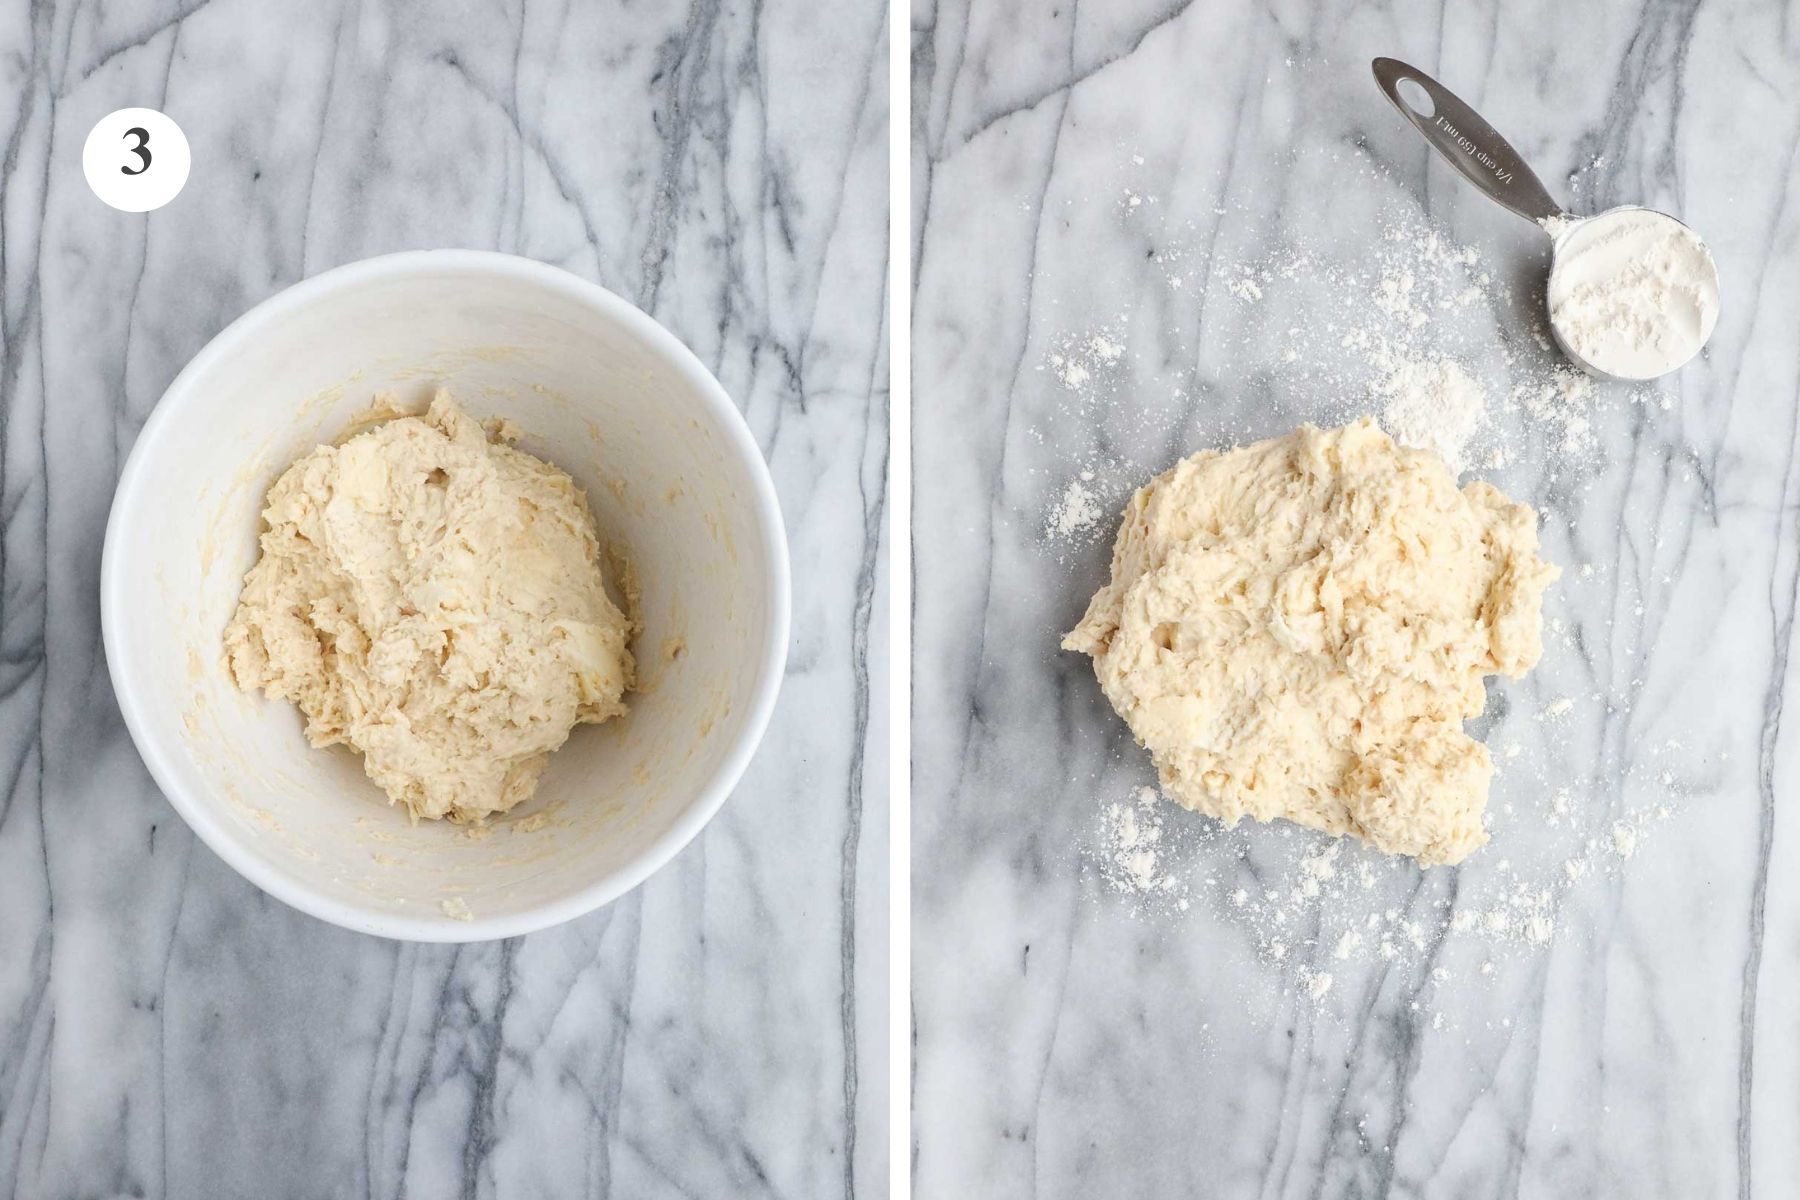
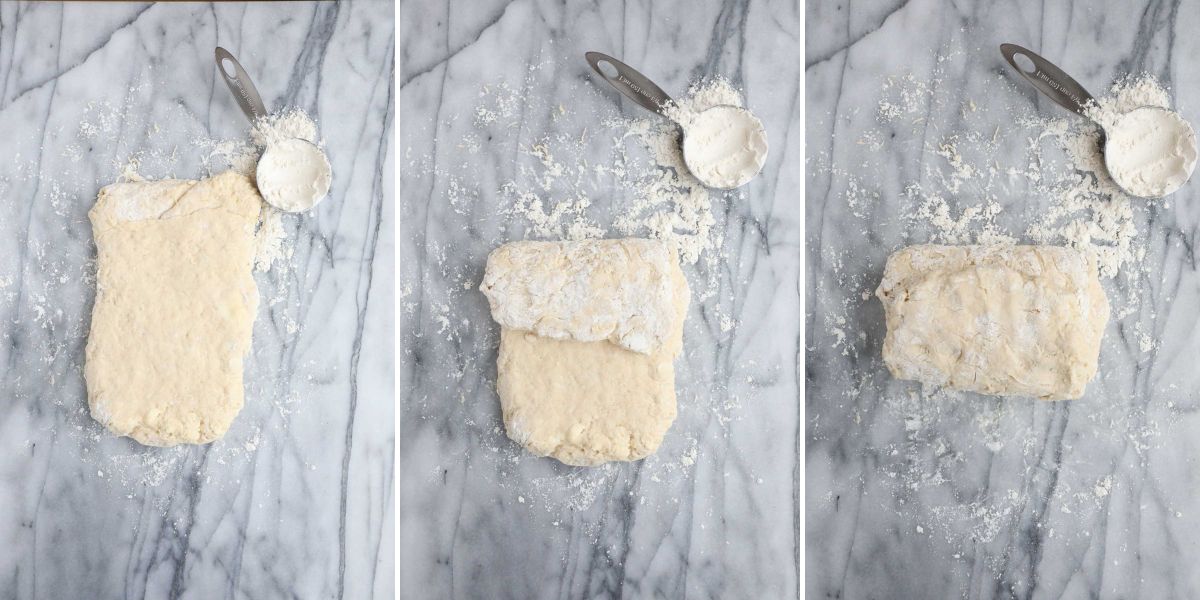
Step 3. Fill a quarter cup measuring cup with flour and set it on your work surface. Use this flour to dust the work surface. Limiting yourself to using the flour in the measuring cup prevents you from adding too much flour to the biscuits. I usually only use about half of what's in the measuring cup.
Turn the dough out onto the counter and lightly coat your fingers in the flour. Press the dough into a rectangle adding small amounts of flour to the top if it is too sticky.

Step 4. Fold the dough: Take the top third of the dough and fold it down over onto the middle of the dough. Then take the bottom third of the dough and fold it up over the now folded dough. Press the dough out again, turn it 90 degrees, and repeat this folding step. I fold the dough two times, but you can add another fold if you like.
Expert tip: Use your fingers to gently press out the dough and fold the layers. Your fingers might get sticky with wet dough. That's okay, the dough is meant to be fairly wet to prevent dry biscuits. Do not use a rolling pin, which with pressure would eliminate the layers.

Step 5. Use a biscuit cutter to cut rounds into the dough. The dough should be 1 inch thick. The thicker the dough you are cutting, the thicker and taller the biscuit will be.
If you are using a 2¾ inch biscuit cutter, you will get 6-7 large biscuits. If you are using a 2 ¼ inch biscuit cutter, you will get 8-9 good-sized biscuits.
Expert Tip: If you do not have biscuit cutters, use a sharp knife to cut square-shaped biscuits (biscuits don't need to be round, square ones are just as excellent). If you have a very thin-rimmed glass, you can use that as well.

Step 6. Place the biscuits touching each other on a baking sheet. The pressure of the nearby biscuits will help the biscuits to rise upwards.
Bake at 375°F for 15-16 minutes. Be sure to adjust the time if you are using a different-sized biscuit cutter.
🪄 Tips and Tricks:
After making dozens and dozens of biscuits here are a few things that I learned.
- The thickness of the dough and the time baking in the oven makes all the difference. These need to be in balance in order to get a buttery, moist biscuit. Even a minute too long in the oven can dry out the biscuits. So, watch it carefully. It’s just like cooking shrimp, one minute too long can ruin it.
- You do not need to brush the tops with melted butter or an egg wash before baking. It’s an extra step that can be eliminated. It does not change the appearance of the biscuits all that significantly. (Though this does make a difference for pie crusts.) Feel free to brush the biscuits with butter or drizzle with honey after they come out of the oven.
- Don’t overmix or overwork the dough. This will create tough, rather than light and fluffy biscuits.
- Cutting the Biscuits: Using a sharp knife or a biscuit cutter (with sharp bottom), allows the biscuits to rise by not sealing the edges when cutting into the dough. You can also use a thin-rimmed glass. If it has a thicker or dull rim, you're better off using a knife.
- Using a Knife: Slice the dough softly without too much pressure to prevent sealing the sides of the biscuits as you press down.
- Using a Biscuit Cutter: If using a biscuit cutter, press straight up and down, and do not twist, to avoid sealing the edges.
- Serve Immediately: Biscuits are best served immediately out of the oven and at the latest on the day of baking.
✏️ Buttermilk Biscuits Without Shortening FAQs
Buttermilk biscuits can be made with butter and buttermilk instead of shortening.
The main difference between biscuits made with butter and those made with shortening is their texture and consistency. Biscuits made with butter have a richer flavor and a slightly denser, more crumbly texture. Biscuits made with shortening are softer, lighter, and more cake-like.
The best way to achieve flaky layers is to fold layers into the biscuit dough using a process called lamination.
If You're Looking For More Breakfast Recipes, You May Love These:


If you tried this Buttermilk Biscuits Without Shortening Recipe or any other recipe on my website, please leave a 🌟 star rating and let me know how it went in the 📝 comments below. Thanks for visiting!

Buttermilk Biscuits
Ingredients
- 6 tablespoon butter, softened
- 1 egg
- 1 cup buttermilk
- 2 cups flour + ¼ cup
- 1½ teaspoon baking powder
- 1 teaspoon baking soda
- ½ teaspoon salt
- 1 tablespoon sugar
Instructions
- Preheat the oven to 375°F.
- In a large mixing bowl, roughly combine the butter, egg, and buttermilk. I use a large spoon and break up the softened butter a little bit, while mixing the egg and buttermilk.
- Add the 2 cups flour, baking powder, baking soda, salt, and sugar. Stir until just combined.
- Fill a quarter cup measuring cup with flour, and set it aside. I use this flour to dust the counter and the dough. I will typically only use about half or even less than half of the quarter cup. Separating it out helps you see how much extra flour you are using which helps you to limit how much you are adding.
- Dust a sprinkle of flour on the counter and turn out the dough. Dust the top of the dough with flour and roughly shape into a ball. Then flatten out the ball of dough into a rectangle, ensuring that there’s a small dusting of flour underneath so that it does not stick. It should be an inch thick or even slightly thicker. If you have a ruler handy you can measure it.
- Using a biscuit cutter, or a sharp knife, cut out 6 biscuits, I use a 2 ¾ inch biscuit cutter.
- Place close together on a baking sheet. Having them close tougher will help them to rise.
- Bake at 375°F for 15-16 minutes.
Notes
-
- Softening Butter: If you have not softened your butter to room temperature ahead of time you can add it to an empty microwavable mixing bowl and microwave it at 40% power for 45 seconds to 1 minute. Be sure not to melt the butter.
- The thickness of the dough and the time baking in the oven makes all the difference. These need to be in balance in order to get a buttery, moist biscuit. Even a minute too long in the oven can dry out the biscuits. So, watch it carefully. It’s just like cooking shrimp, one minute too long can ruin it.
- You do not need to brush the tops with melted butter or an egg wash before baking. It’s an extra step that can be eliminated. It does not change the appearance of the biscuits all that significantly. (Though this does make a difference for pie crusts.) Feel free to brush the biscuits with butter or drizzle with honey after they come out of the oven.
- Don’t overmix or overwork the dough. This will create tough, rather than light and fluffy biscuits.
- Do not use a rolling pin. Use your fingers to pat out the dough.
- Cutting the Biscuits: Using a sharp knife or a biscuit cutter (with sharp bottom), allows the biscuits to rise by not sealing the edges when cutting into the dough. You can also use a thin-rimmed glass. If it has a thicker or dull rim, you're better off using a knife.
- Using a Knife: Slice the dough softly without too much pressure to prevent sealing the sides of the biscuits as you press down.
- Using a Biscuit Cutter: If using a biscuit cutter, press straight up and down, and do not twist, to avoid sealing the edges.
- Serve Immediately: Biscuits are best served immediately out of the oven and at the latest on the day of baking.


Leave a Reply