• Skip to primary navigation
  • Skip to main content
  • Skip to primary sidebar
  • Skip to footer
Elle & Pear
  • Summer Recipes
  • Recipes
  • Travel
  • About
  • Subscribe
menu icon
go to homepage
search icon
Homepage link
  • Summer Recipes
  • Recipes
  • Travel
  • About
  • Subscribe
×
Home » Recipes » Cookies

Krumkaker Norwegian Waffle Cookies

By Lauren | Updated: Dec 8, 2023 | Published: Jan 5, 2022 | Leave a Comment

Jump to Recipe

Krumkaker Norwegian Waffle Cookies are a traditional Norwegian dessert shaped like a thin and crispy waffle cone. They can be eaten plain or filled with whipped cream and berries.

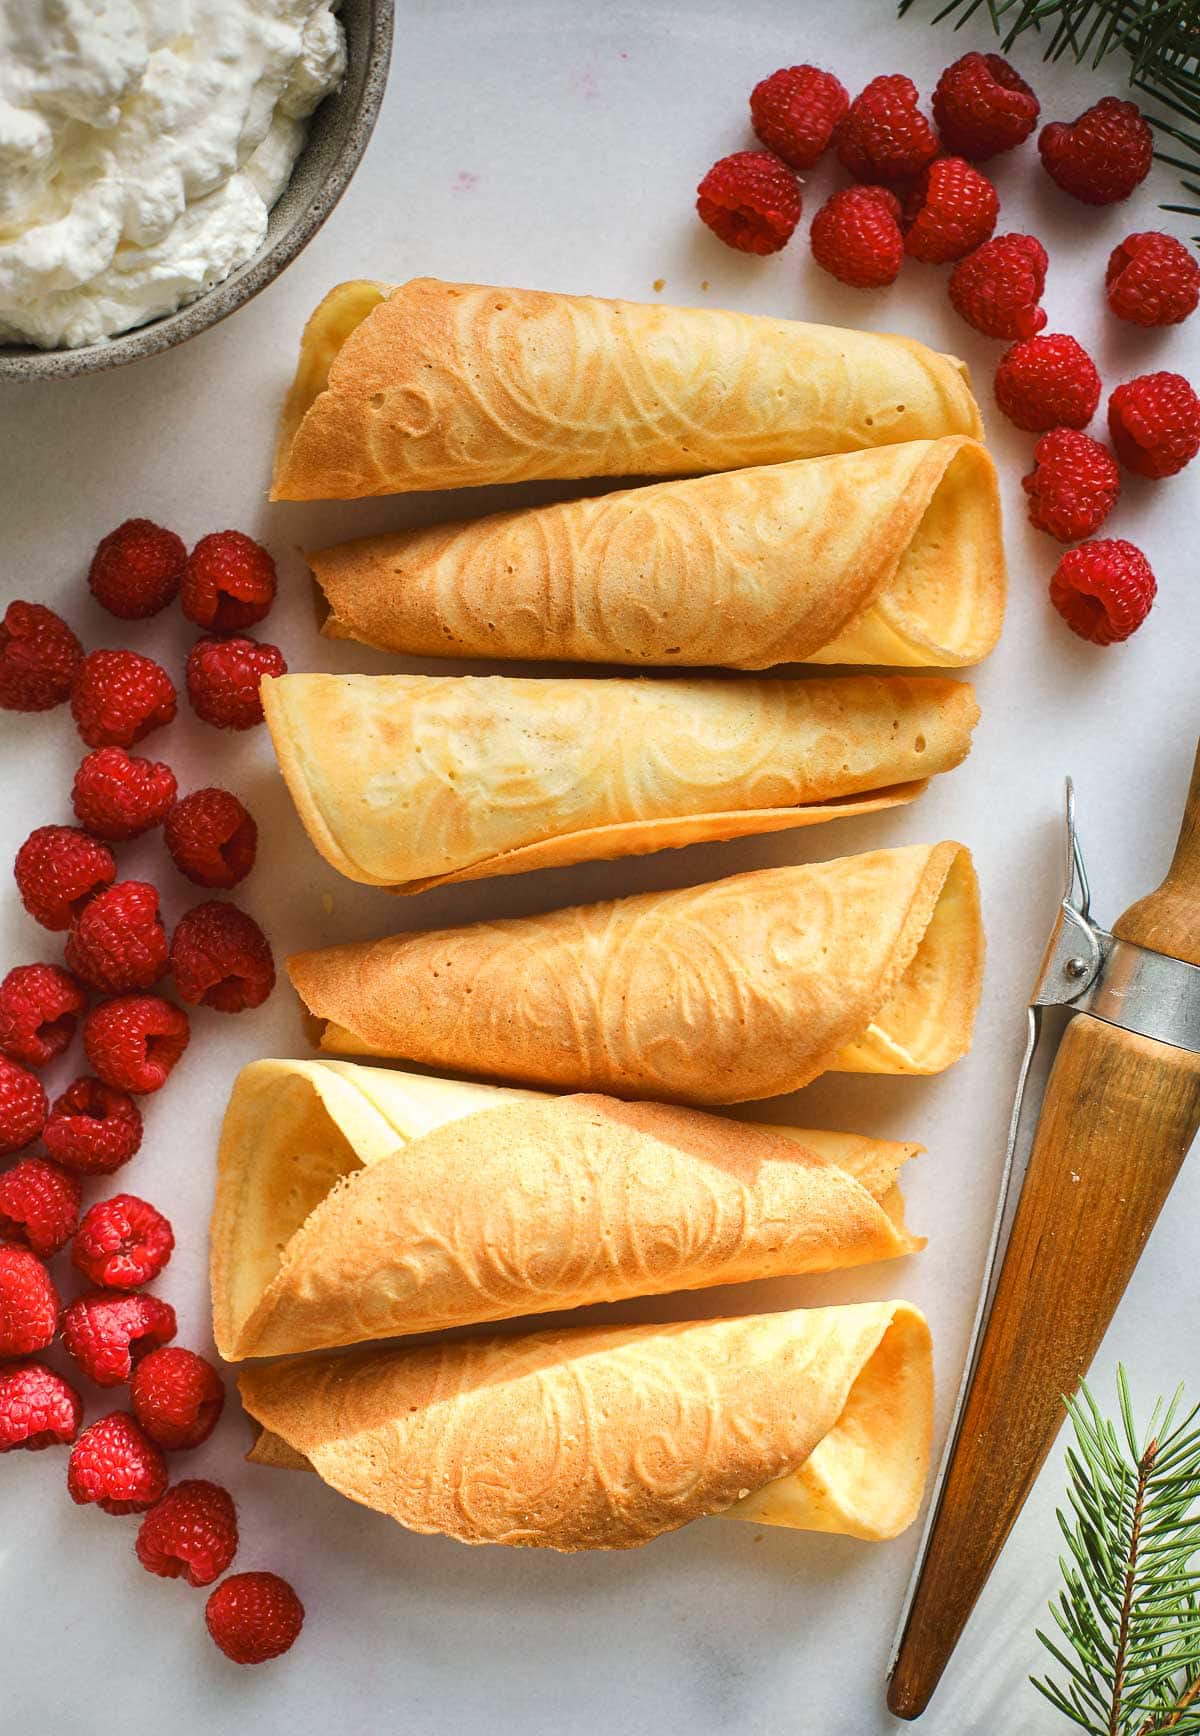
To make krumkaker, batter is poured onto an ultra thin hot waffle iron. The waffle, or “cookie” turns golden brown and is imprinted with a detailed design from the iron itself. Traditionally, it is then quickly shaped into a cone and left to cool until it hardens. Below are tips, tricks, tools needed, and step-by-step instructions on how to make krumkake.

Krumkaker cones on a light background with a wooden dowel with a clip, raspberries and whipped cream on the side

Krumkaker are often made around Christmas time. Traditionally, Norwegian families would make seven different kinds of cookies to host their family and friends along with plenty of coffee during the holidays. They can be eaten plain or filled with whipped cream and berries. It is a super light and not overly sweet dessert, but satisfyingly crispy. They’re also very simple and quick to make once you have the right tools.

  • Krumkake is singular, krumkaker is plural
  • Krumkake means "curved cake"
  • Krumkake is pronounced "KRUHM - ka ka"

Recipe Inspiration

My husband’s family is from Norway and has been making krumkaker for many decades. This recipe is adapted from the Norwegian Cookbook, Gyldendal Nye Store Kokebok by Aase Kilander Pharo and Marie-Elisabeth Schreiner Jaroy, which my mother-in-law uses to make krumkaker. It is something that we all look forward to every year. I even made sure to buy a krumkaker iron when visiting Norway several years ago that I brought back and use with an outlet converter.

Simple Recipe

This recipe is simple with very few ingredients and straightforward and easy steps. It does not require you to rest or refrigerate the batter.

I’ve made this recipe many times and have not seen any difference when resting the batter. I have also experimented with refrigerating and not refrigerating the batter.  If you have the right balance of wet to dry ingredients you do not need to refrigerate the batter, you only need to ensure that the melted butter has cooled to room temperature.

Krumkake Tools

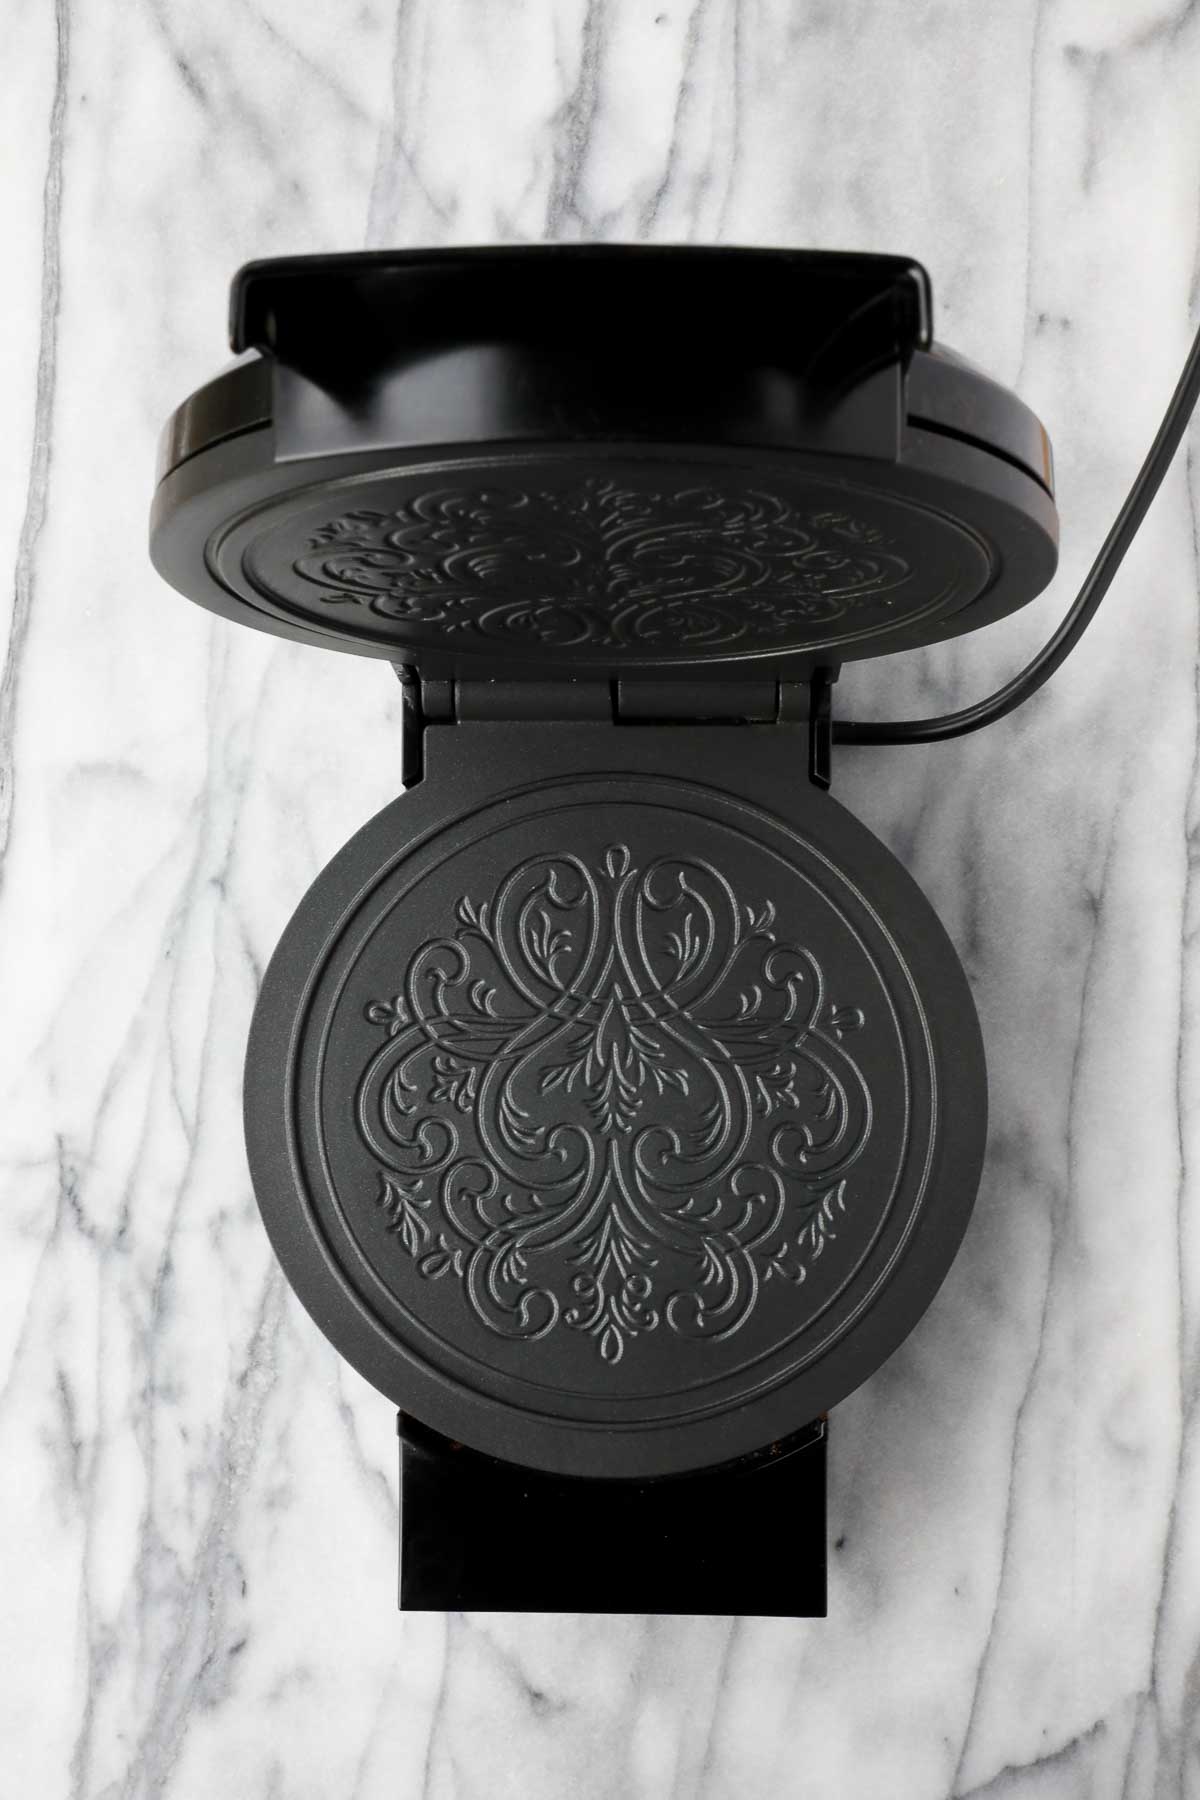
Krumkaker Iron: Krumkaker are made with a specialty krumkaker iron. This specialty iron is designed to create a very thin waffle cookie. It also typically has a unique design that imprints onto the waffle cookies.

I bought my electric krumkaker iron in Norway from a brand called Wilfa and I use an outlet to converter to use it here in the US. However, if you’re looking to buy one in the US, a brand called Chef’sChoice has an electric krumkaker iron called, Chef’sChoice Krumkaker Maker Express. You can also buy the stovetop version, but my recommendation would be to get an electric version which is very easy to use.

An alternative is a pizzelle iron, but these result in a thicker cookie with a different design imprint.

Cone Shaped Dowel: These wooden cone shaped dowels are easy to find and inexpensive. There is a version of this dowel specifically for krumkaker that comes with a clip. It is great for pulling the krumkaker off the iron and rolling it without ever having to touch the hot cookie with your hands (see picture at the top). However, they are impossible to get in the US, and seem to only be sold in stores in Norway. The one shown in the photo at the top is borrowed from my mother-in-law, who has been using it for over 40 years.

Kitchen towel: If you do not have the dowel with a clip, use a kitchen towel doubled over to roll the hot krumkake around the cone shaped dowel. This will help prevent you from burning your fingers. Be sure to choose a kitchen towel that you are okay getting dirty. The butter from the krumkaker may damage the towel as you roll them.

Ice Cream/Cookie Scoop (optional): Used to scoop the batter onto the waffle iron. This is optional, but makes the process easier.

Tongs: Use kitchen tongs to pull the krumkake off the iron and place on the kitchen towel or in a ramekin to shape into bowls. See shaping techniques further below.

Krumkaker Batter

These krumkaker are light and airy because air is beaten into the eggs in the batter. You do not need to beat a lot of air into the eggs, just whip them along with the sugar for 30-45 seconds and you’ll start to see the air bubbles in the batter.

TIP: If you prefer heftier krumkaker or want to make them like ice cream cones, do not beat any air into the batter and reduce the amount of water added by 1-2 tablespoons. This will result in a thicker waffle cookie.

Consistency: The batter should be fairly thin, but not watery. If there is too much water it will take longer for the water to cook off in the iron, increasing the overall cooking time. If you place the batter on the hot iron, it should spread slightly, but it will not continue to spread to cover the entire iron. Look for a consistency that’s similar to pancake batter. Err on the side of less water, as you can always make one and add more water if you think the krumkaker are too thick. The thickness of the krumkaker comes down to personal preference, but traditionally they are fairly light and thin.

The thickness of the krumkaker will depend on the amount of liquid in the batter (i.e. how much water added) and the temperature. A cooler batter will result in a thicker waffle cookie.

Krumkake stacked on top of other krumkaker shaped like a cone.

Shaping the Krumkaker

There are a few different ways that you can shape krumkaker. Once the waffle cookies are golden brown in the krumkaker iron, pull them out with kitchen tongs and shape them into either a cone, a bowl or a flat cookie. They harden very quickly, so you’ll need to work quickly to make them into the shape that you want.

  1. Cones: Traditionally krumkaker are rolled into cones with a wooden dowel. To roll the krumkake into a cone, pull the krumkake off the iron with a pair of kitchen tongs and lay flat on a kitchen towel that has been doubled over. Roll the towel and the krumkaker over the dowel to shape into a cone, protecting your fingers with the towel as you go.
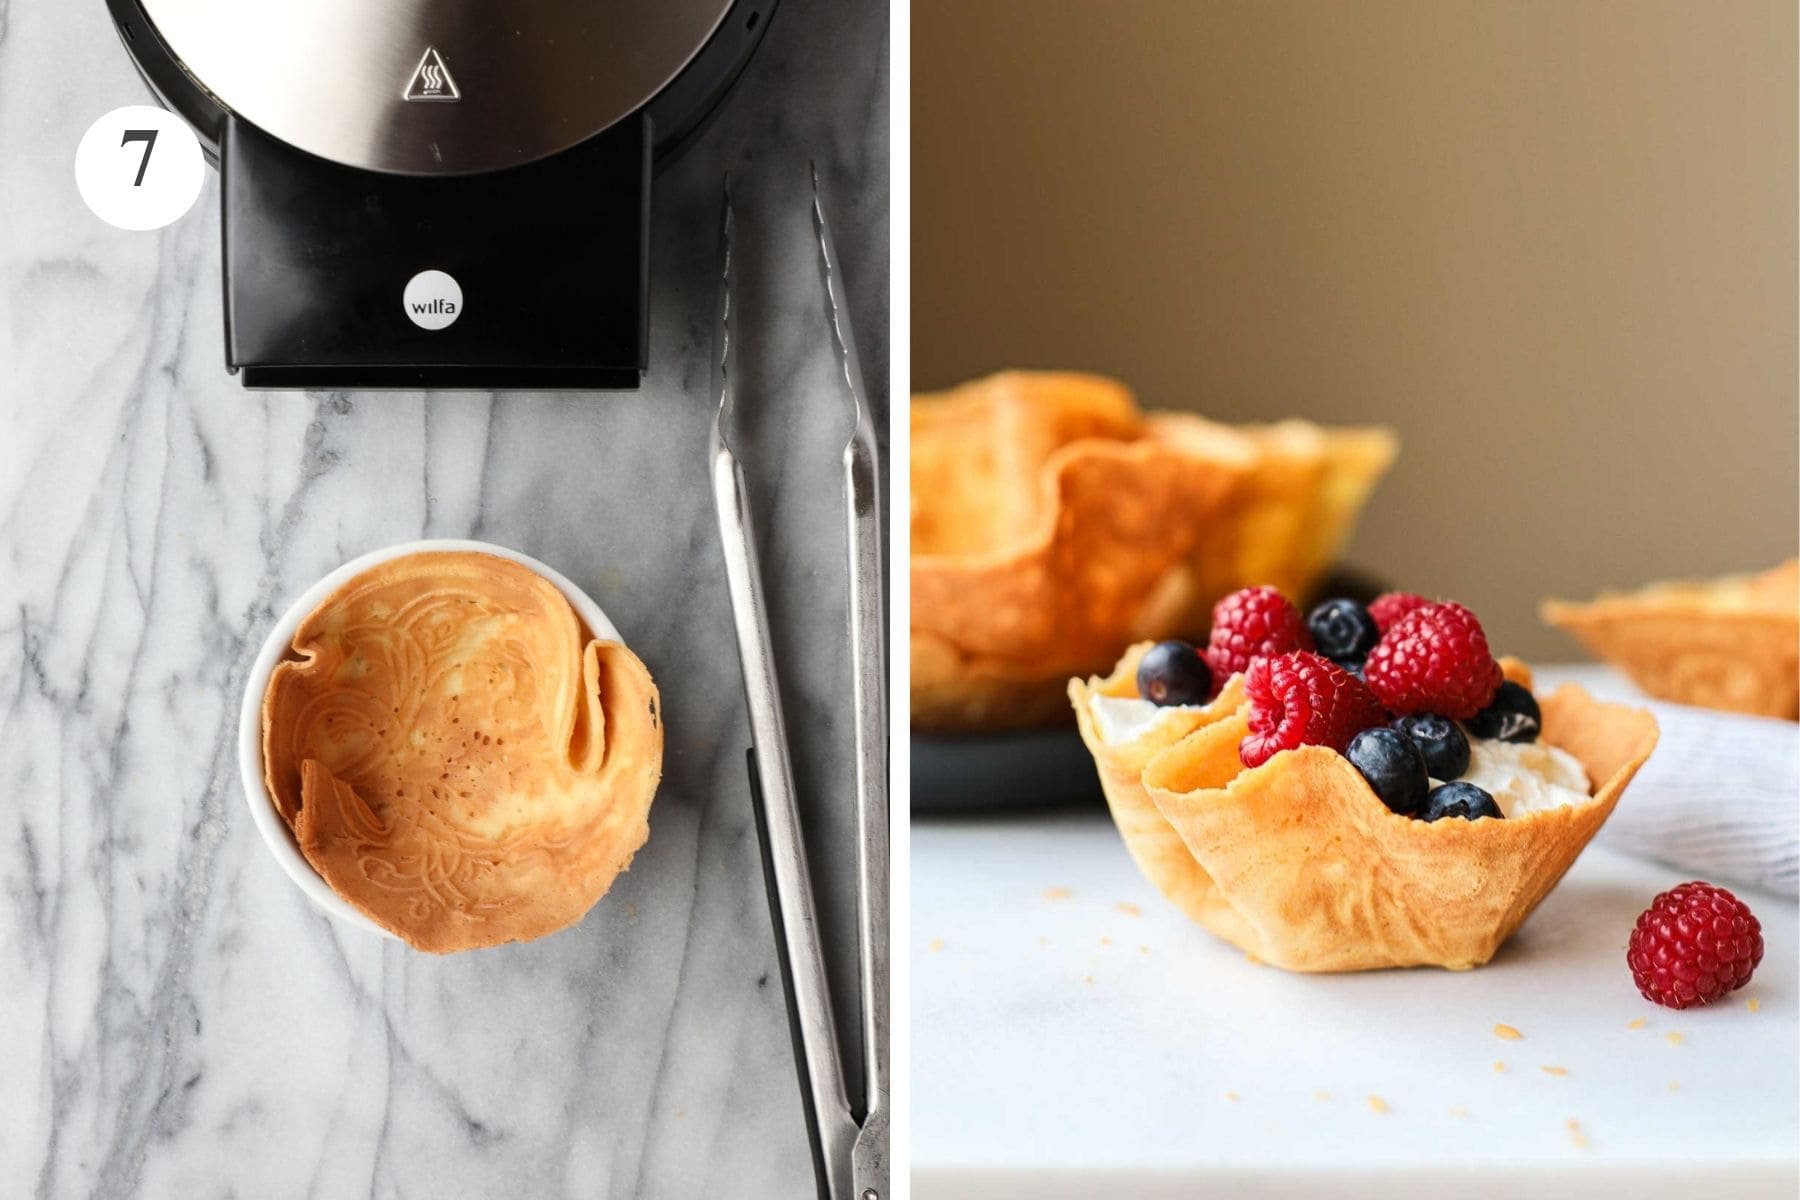
  2. Waffle Bowls: To shape the krumkaker into waffle bowls, using tongs, pull the krumkaker off the iron and press it gently into a ramekin. You can also use the back of a spoon along with the tongs to press the bottom of the waffle cookie into the flat bottom of the ramekin, therefore creating a flat-bottomed waffle cookie. This is helpful for when you are filling it with whipped cream or ice cream. It will then sit flat on your plate and make it easier to eat.
  3. Flat Krumkaker Cookies: Rather than shaping them into cones or bowls you can lay them on a flat surface and allow them to cool and harden.

Ingredients

Below are the ingredients needed to make Krumkake waffle cookies.

Ingredients needed to make krumkake.
  • Butter: Melted, but cooled to room temperature. I use salted butter.
  • Granulated sugar: Allows the krumkaker to harden when cooled.
  • Eggs: Whipping a little bit of air into the eggs creates a lighter, crispy krumkake.
  • Flour: Use all-purpose flour.
  • Water: To thin out the batter for a lighter consistency.

To learn more about these cookie ingredients, see my Guide to Cookie Ingredients.

See the recipe card for full information on ingredients and quantities.

Hot to Make Krumkaker Norwegian Waffle Cookies

Below are the step-by-step instructions and photos for how to make Krumkaker Norwegian Waffle Cookies. Be sure to see the photos on the different ways that you can shape the cookies.

*Note that the recipe card with instructions and ingredient list is included further below these step-by-step photos.

Wilfa norwegian krumkaker waffle iron closed and open with pattern inside.

Step 1. Preheat the krumkaker iron.

The first step in making the batter, a mixing bowl with eggs and sugar and the bowl after the eggs and sugar have been beaten together.

Step 2. In a large bowl beat the sugar and eggs for 30-45 seconds on low speed. This will beat some air into the batter.

Krumkake batter with flour and melted butter before it is mixed in and after it is mixed in.

Step 3. Add the melted butter (ensure that it has cooled to room temperature) and flour and beat to combine.

Krumkaker batter with water not mixed in, and after it is mixed in.

Step 4. Add the water and beat until combined.

Krumkake batter on the waffle iron and the fully cooked krumkake on the waffle iron.

Step 5. Add 2-3 tablespoons of the batter to the preheated electric krumkake iron. You can use an ice cream scoop to do this if you have one. Close the iron lid and let cook until it is a bright golden brown. The timing will depend on the specific iron, but typically it will take 30 seconds – 1 minute. Mine takes quite a bit longer likely because we bought ours in Norway and use an outlet converter to plug it in.

Shaping the krumkaker into a cone with a kitchen towel and a cone shaped dowel.
Shaping the krumkaker into a bowl in a ramekin and another one into a flat cookie.

Step 6. Remove the krumkake with tongs from the iron and very quickly shape it into a cone or bowl. See specific steps below.

6a. Cone: Place the hot krumkake on a doubled over kitchen towel. Roll the towel and the krumkake around the wooden dowel to form a cone. It will harden as it cools.

6b. Bowl: Using tongs and the back of a spoon press the hot krumkake into a small ramekin, flattening the bottom of the krumkake against the inside bottom of the ramekin.

6c. Flat Disk: Remove the hot krumkake from the iron and allow to cool flat on a cutting board or other flat surface.

Krumkaker Filling

Krumkaker cones are often filled with whipped cream and berries, but they are also great eaten on their own. Below are a few ideas for filling your krumkaker.

  • Whipped Cream
  • Berries
  • Ice Cream
  • Yogurt

I've also made these in bowl shapes and filled them with maple mascarpone whipped cream.

Variations

Here are a few simple variations for krumkaker.

  • Vanilla extract: I've experimented with this and you can certainly add it, but it does not have a big impact in overall flavor.
  • Almond extract: Often used in Norwegian baking
  • Cardamom: Also often used in Norwegian baking

Expert Tips:

Batter Consistency: For a thinner waffle cookie add 1-2 tablespoons of water at a time checking each time until you’ve reached the desired thickness of the cookie. I find that ½ cup of water in this recipe is the right ratio for me.

Filling: Serve with whipped cream and berries, but do not fill with whipped cream until right before it is eaten to prevent the moisture from the whipped cream getting absorbed into the cookie and making it soft or soggy.

Krumkaker FAQs

How to store Krumkaker?

Krumkaker can be stored in a large cookie tin. This helps to prevent them from getting smashed and broken as they are delicate. Be sure that the krumkake have fully cooled before storing.

How long will Krumkaker last?

In the winter or in dry climates krumkaker will last for 2-3 weeks or even longer. However, if you are in a warm or humid climate the shelf life is significantly shorter at 2-3 days. The humidity will soften the krumkaker fairly quickly changing the consistency from crispy and crunchy to soft.

Why are my Krumkaker soft?

Krumkaker can end up being soft if they have not been cooked long enough in the krumkaker iron. They should be a deep golden brown color. If they are a pale yellow, they haven’t been cooked long enough. There will be excess moisture which will prevent them from hardening and becoming crispy.
 
They can also become soft over 2 or 3 days if they are exposed to humid conditions.

If you're looking for other dessert recipes, you may love these:

  • Swedish Apple Pie in a round fluted dish with two scoops of ice cream melting into the pie.
    Crustless Apple Pie (Swedish Apple Pie)
  • Vanilla Bean Sugar cookies piled on a white plate on a white background, with some rolled in vanilla sugar and a couple of small white flours.
    Vanilla Bean Cookies
  • Cookies arranged on a flat surface surrounded with greenery.
    Grandma's Molasses Cookies with Maple Glaze
  • Krumkake Norwegian Waffle Bowl with Maple Mascarpone Whipped Cream

If you make these Krumkaker Norwegian Waffle Cookies, I'd love to hear from you and learn how it went. Leave a rating and a comment down below and let me know how it turns out. Your feedback means a lot!

Krumkaker Norwegian Waffle Cookies

Krumkaker are a traditional Norwegian dessert made in the shape of a waffle cookie. They are made by pouring batter onto a krumkake iron and rolling it into a cone shape while still hot. 
5 from 6 votes
Print Recipe Pin Recipe
Prep Time 10 minutes mins
Cook Time 32 minutes mins
Total Time 42 minutes mins
Author Lauren Skardal
Course Dessert
Cuisine Norwegian
Servings 16
Calories 2024 kcal

Ingredients
  

  • ¾ cup granulated sugar
  • 3 eggs
  • 8 tablespoon butter (1 stick), melted and cooled to room temperature
  • 1 cup all-purpose flour
  • ½ cup water
  • whipped cream, for serving optional
  • berries, for serving optional

Instructions
 

  • Preheat the krumkaker iron.
  • In a large bowl beat the granulated sugar and eggs for 30-45 seconds on low speed. This will beat some air into the batter.
  • Add the melted butter (ensure that it has cooled to room temperature) and flour and beat to combine.
  • Add the water and beat until combined.
  • Add 2-3 tablespoons of the batter to the preheated electric krumkake iron. You can use an ice cream scoop to do this if you have one. Close the iron lid and let cook until it is a bright golden brown. The timing will depend on the specific iron, but typically it will take 30 seconds –1 minute.
  • Remove the krumkake with tongs from the iron and very quickly shape it into a cone, or bowl, or leave flat.
    Cone: Place the hot krumkake on a doubled over kitchen towel. Roll the towel and the krumkake around the wooden dowel to form a cone. It will harden as it cools.
    Bowl: Using tongs and the back of a spoon press the hot krumkake into a small ramekin, flattening the bottom of the krumkake against the inside bottom of the ramekin.
    Flat Cookie: Remove the hot krumkake from the iron and allow to cool flat on a cutting board or flat surface.
    Allow to cool fully. Serve plain or with whipped cream and berries.

Notes

Equipment: Be sure to have a krumkaker waffle iron (electric is easiest), along with a cone shaped dowel, tongs, and a kitchen towel that can get dirty. If you have an ice cream scoop that can be helpful.
Whipping the eggs: Beat the eggs for 30-45 seconds on low speed to add air to the batter for a lighter, crispier waffle cookie.
Batter consistency: For a thinner waffle cookie add 1-2 tablespoons of water at a time checking each time until you’ve reached the desired thickness of the cookie. I find that ½ cup of water in this recipe is the right ratio for me.
Shaping the krumkaker: Use a doubled over kitchen towel to roll the krumkaker around the cone shaped dowl to prevent you from burning your fingers.
Filling: Serve with whipped cream and berries, but do not fill with whipped cream until right before it is eaten to prevent the moisture from the whipped cream getting absorbed into the cookie and making it soft or soggy.

Nutrition

Calories: 2024kcal | Carbohydrates: 246g | Protein: 30g | Fat: 105g | Saturated Fat: 62g | Polyunsaturated Fat: 6g | Monounsaturated Fat: 28g | Trans Fat: 4g | Cholesterol: 732mg | Sodium: 918mg | Potassium: 346mg | Fiber: 3g | Sugar: 151g | Vitamin A: 3512IU | Calcium: 125mg | Iron: 8mg
Have you tried this recipe? Leave a comment below and share a photo on instagram and tag @elleandpear or #elleandpear. I'd absolutely love to hear from you and see what you're making!

More Tasty Cookies

  • Baking soda, turbinado sugar, salt, eggs, vanilla extract, chocolate chips
    A Guide to The Most Common Cookie Ingredients
  • A stack of Espresso Chocolate Chunk Cookies, with half of the cookies broken in half exposing the melted chocolate interiors.
    Chewy Espresso Chocolate Chunk Cookies
  • Small Batch Chocolate Chip Cookies on a golden baking sheet.
    A Guide to Crispy, Cakey, and Small Batch Cookies
  • An Einkorn Chocolate Chip Cookie on a white marble backdrop with several cookies including a broken cookie nearby.
    Best Chewy Einkorn Chocolate Chip Cookies

Reader Interactions

5 from 6 votes (6 ratings without comment)

Leave a Reply Cancel reply

Your email address will not be published. Required fields are marked *

Recipe Rating


Primary Sidebar

Lauren sitting at table in Tuscany with a glass of wine, charcuterie and rolling green hills and winery in the background.

I'm Lauren, I've worked in Finance, earned an MBA, and lived and traveled throughout Europe and the US. I love to cook and bake, and bring our family together around the table. Recipes shared here are real family recipes with real fresh ingredients inspired by our travels.

More about me →

Summer Recipes

  • A bowl of Lemon Basil Pesto Pasta with Burst Cherry Tomatoes, Crispy Prosciutto, and creamy buratta.
    Lemon Basil Pesto Pasta With Burst Cherry Tomatoes
  • A two layer Lemon Blueberry Mascarpone Cake with lemon curd filling and mascarpone fosting.
    Lemon Blueberry Mascarpone Cake
  • A Lemon Meringue Pie Cookie with a bite taken out of it on a white marble serving board with a cookie in the foreground and background.
    Lemon Meringue Pie Cookies
  • A Spanish Salad including mixed greens, olives, orange segments, kumquats, and toasted almonds on a patterened plate.
    Spanish Salad
  • Raspberry Lemon Loaf cross section with lemon glaze dripping over a slice with lemons and raspberries for garnish.
    Raspberry Lemon Loaf
  • A white plate filled with Pasta with Pancetta and Peas on a white and grey striped napkin with crusty bread, white wine, and basil surrounding the plate.
    Pasta with Pancetta and Peas

Most Popular

  • Banana Bread in square baking dish on a light background.
    Banana Bread without a Loaf Pan
  • A potato and rosemary pizza on a white background with three slices cut surrounded by rosemary garnish.
    Potato and Rosemary Pizza
  • Overhead shot of slices of lemon pie without meringue on white plates with pink flowers and the remaining pie above.
    Lemon Pie Without Meringue
  • Thick slices of banana bread covered in a white maple glaze on a light background.
    Banana Bread Glaze
  • Thick slices of banana bread with streusel topping on a white serving board surrounded by crumbs.
    Banana Bread with Streusel Topping
  • Chocolate Chip Rice Krispie Cookies stacked on top of each other showing the insides of the cookies and the melted chocolate chips.
    Chocolate Chip Rice Krispie Cookies

Footer

Search for a recipe or travel destination

  • Instagram
  • Pinterest

Footer

↑ back to top

Recipes

  • Breakfast
  • Sides & Appetizers
  • Soup
  • Main Dish
  • Dessert

Travel

  • US
  • California
  • Europe
  • Spain

About

  • About
  • Privacy Policy

COPYRIGHT © 2025 ELLE & PEAR

Rate This Recipe

Your vote:


A rating is required
A name is required
An email is required

Recipe Ratings without Comment

Something went wrong. Please try again.