This Christmas Cookie Tree is made with thick, soft sugar cookies decorated with homemade sanding sugar. It's a super fun, simple, and impressive Christmas baking project.
A set of concentric stacking star cookie cutters is used to cut out star shapes, which are decorated with green sugar and simply assembled on top of each other in an alternating pattern to create a Christmas Tree.

I started making this Christmas Cookie Tree when my son, whose birthday is in November, requested a vanilla cake with chocolate frosting decorated with a Christmas tree on top.
I settled on topping his cake with this Christmas Cookie Tree. It was quite awe-inspiring with the birthday candles glowing, the lights dimmed, and the towering tree on top of the cake.
For the cookies, I use my Cut Out Sugar Cookie Recipe, which I have been making since I was quite young. See my tip below for getting those perfectly crisp cookie edges.
Jump to:
🌟 Why You'll Love This Recipe
- Fun kid-friendly Christmas baking project, makes the holiday feel special
- Impressive centerpiece, cake topper, stand-alone display, or host gift
- Easy, with simple pantry ingredients
- No royal icing or buttercream.
- Made with delicious, melt-in-your-mouth cookies.
🥣 Required Equipment
This Christmas Cookie Tree project requires a set of concentric star cookie cutters. These graduated star cookie cutters can be purchased in stores, such as Crate and Barrel, Williams Sonoma, or online on Amazon. The set is fairly inexpensive. The set I use has 10 star cookie cutters, ranging in size from 5.5 inches to 1.2 inches.
🧁Homemade Sanding Sugar for Decorating
Rather than using royal icing or frosting to decorate each cookie, I make homemade sanding sugar with granulated sugar and food coloring. It’s a simple trick for decorating sugar cookies rather than buying separate decorating sugar or icing at the store.
The sugar will melt slightly in the oven and adhere to the cookie, creating a bright, colorful cookie without sugar going everywhere. It's easy and inexpensive.
🛒 Ingredients and Variations
Below are the ingredients needed to make this Christmas Cookie Tree, including the sugar cookies and the homemade sanding sugar.

Sugar Cookies
- Butter: Use softened butter. If needed, you can soften the butter by microwaving it at 20% power for 30 seconds at a time, flipping it over in between. I use salted butter.
- Sugar: Use granulated sugar. These cookies are not overly sweet.
- Egg yolks: Use the yolks of large eggs, pasture-raised if possible. The yolks add fat and flavor.
- Vanilla extract: Use real vanilla extract, not imitation vanilla. Costco sells vanilla extract in a large bottle for a low cost per unit volume.
- Salt: To balance and bring out flavor.
- Flour: Use all-purpose unbleached flour. Being precise with the amount of flour in this recipe is helpful. Use a kitchen scale to measure the flour if possible. If there’s too much flour, it's hard to roll out the dough; too little and the cookies will spread in the oven. This can be corrected by adding a small amount of water if the dough cracks when rolling it out, or adding a small amount of flour if the dough is too soft.
Colored Sanding Sugar
- Granulated Sugar: For making homemade sanding sugar, a portion for the green sugar, and a portion for the yellow sugar.
- Food Coloring: Green food coloring for the tree and yellow for the star on top. I use basic liquid food coloring from a typical grocery store, but you can also use gel food coloring found at specialty stores.
Variations
- Use royal icing or buttercream to decorate.
- Buy decorative or specialty Christmas sprinkles to add the effect of ornaments on the tree.
- Double the recipe and make two cookies for each cookie cutter to assemble an extra tall Christmas Tree.
- Use a cut-out gingerbread cookie dough instead of this sugar cookie dough.
See the recipe card for full information on ingredients and quantities.
📝 Tutorial: How to Make a Christmas Cookie Tree
Below are the step-by-step instructions for how to make a Christmas Cookie Tree. This tutorial shows each step from baking the cookies, decorating with sanding sugar, and assembling the tree with pictures and tips.
Note: The recipe card with instructions, ingredient list, and quantities is included further below these step-by-step photos.

Step 1. Make the Dough: In a large mixing bowl, combine the softened butter and granulated sugar. Add the egg yolks, vanilla extract, and salt, and combine. Add the flour and combine.

Step 2. Chill the Dough: Shape the dough into a round ball, then flatten it into a rectangle. Wrap in plastic wrap and refrigerate for 30 minutes to 1 hour or overnight.
Tip: Shaping the dough into a flat rectangle helps the dough chill faster, and it makes it easier to roll it out after it has cooled.
Step 3. Make the Sanding Sugar: Add ½ cup granulated sugar to a small bowl. Add 10-15 drops of green food coloring, mixing it into the sugar by mashing it with the back of a spoon until the food coloring is fully incorporated.
Add 2 tablespoons of granulated sugar to a separate bowl and 4 drops of yellow food coloring. Mix the food coloring into the sugar until the sugar turns a bright yellow color.
Note: I've found that store-bought sanding sugar does not adhere as well to the cookies.

Preheat the Oven: When ready to make the cookies, preheat the oven to 350°F.
Step 4. Roll Out the Dough and Cut Out the Cookies: Dust a clean work surface with flour. Place the chilled dough on the floured surface and sprinkle the dough and the rolling pin with flour. If the dough is too cold, let it warm up on the counter for 15-20 minutes. Roll out the dough so that it is just under ½ an inch thick. Cut out the star cookies starting with the largest star and working your way from largest to smallest.
Cut out one cookie for each star cookie cutter, except cut out two of the smallest star shape. One will lie flat at the top of the tree (with green decorating sugar), and the other will stand upright as the star on the top of the tree (with yellow decorating sugar).
Scrunch up the dough and roll it out again to fit all of the smaller stars.
Place the larger stars on one baking sheet, and the smaller stars on a separate baking sheet. Given the size difference of the cookies, they will bake at slightly different baking times.
Tip: Cut out additional stars or other shapes with the excess dough for snacking on, decorating, or as backup if any of the cookies break while assembling (This is unlikely. They are soft but sturdy cookies).
Reserve a tiny bit of dough to use as glue to connect the top star of the tree to the rest of the tree. Do not eat raw dough.
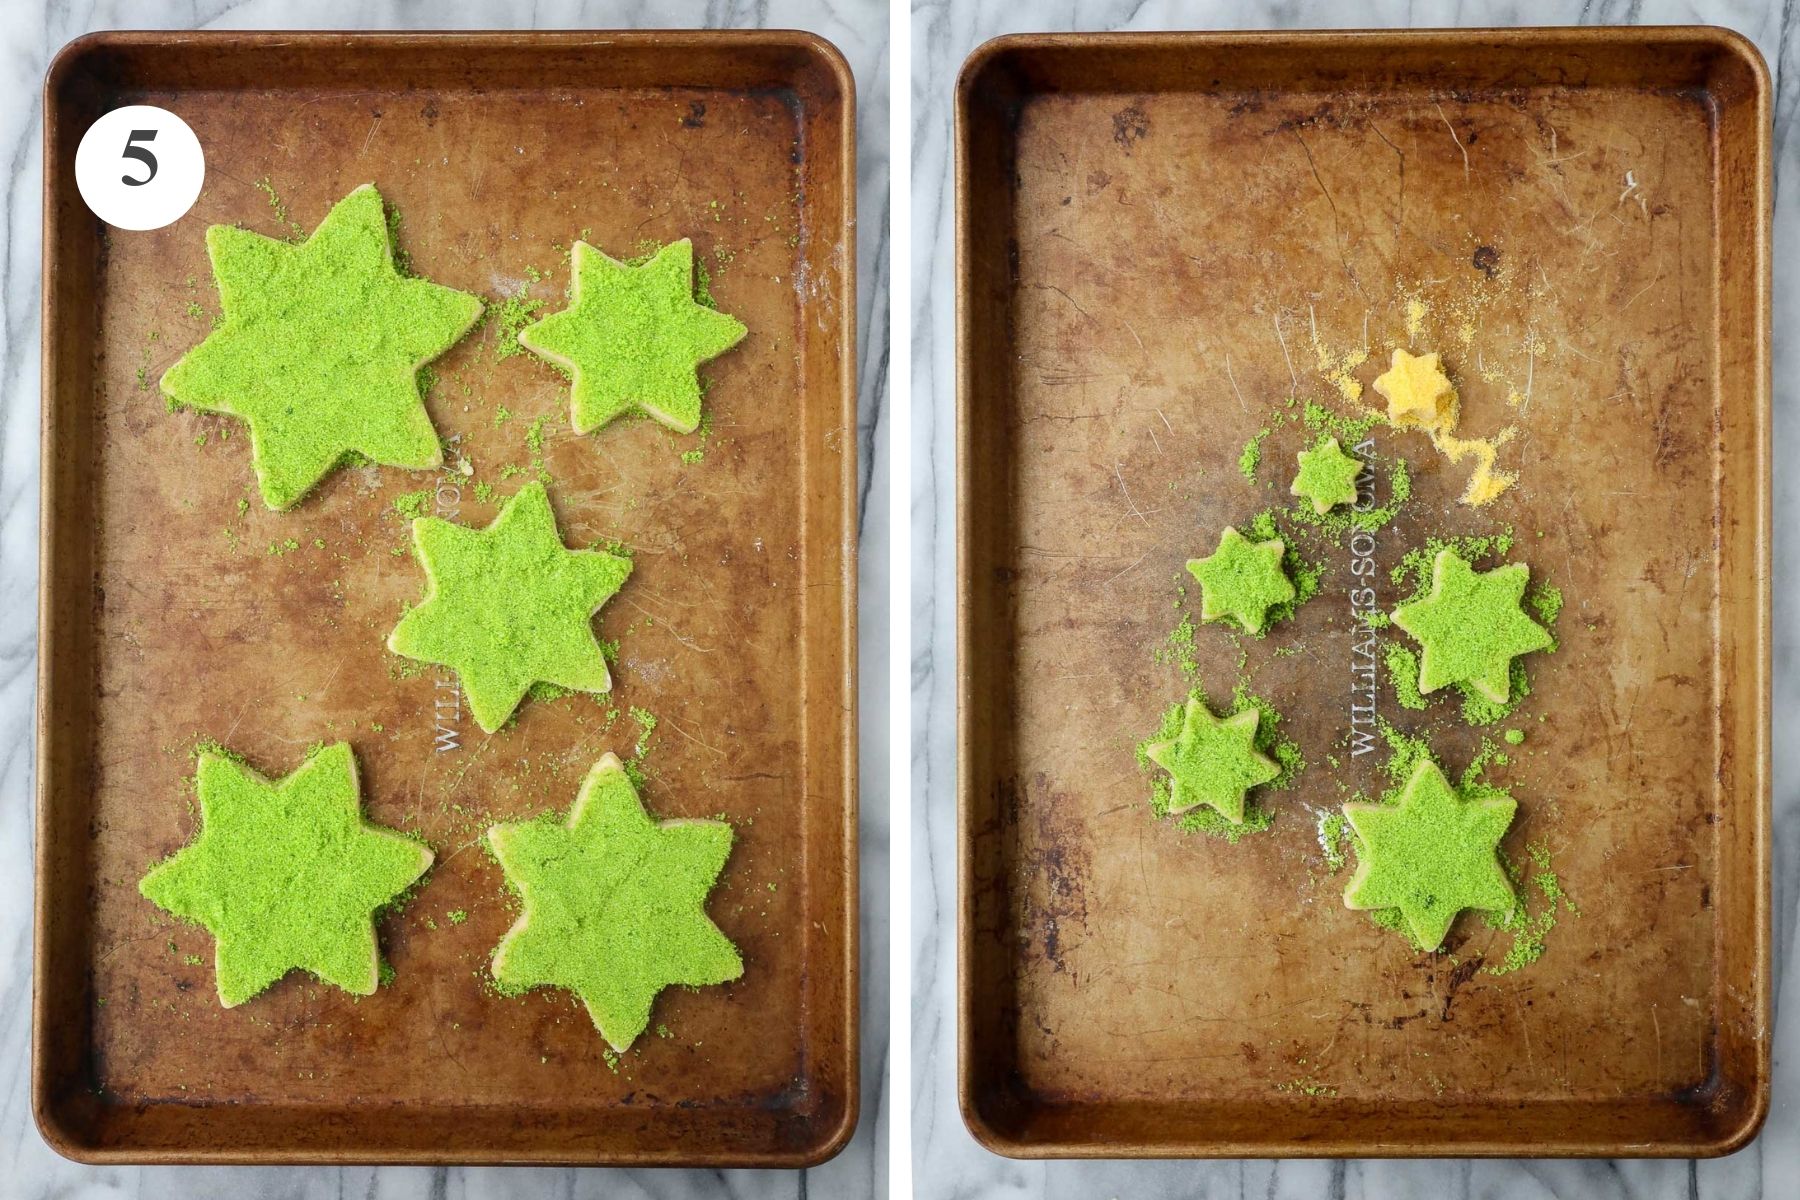
Step 5. Decorate with Sanding Sugar: Use a small spoon and your fingers to spread the sugar over the tops of the cookies. Decorate all but one of the smallest stars green. Decorate the other smallest star with yellow sugar.
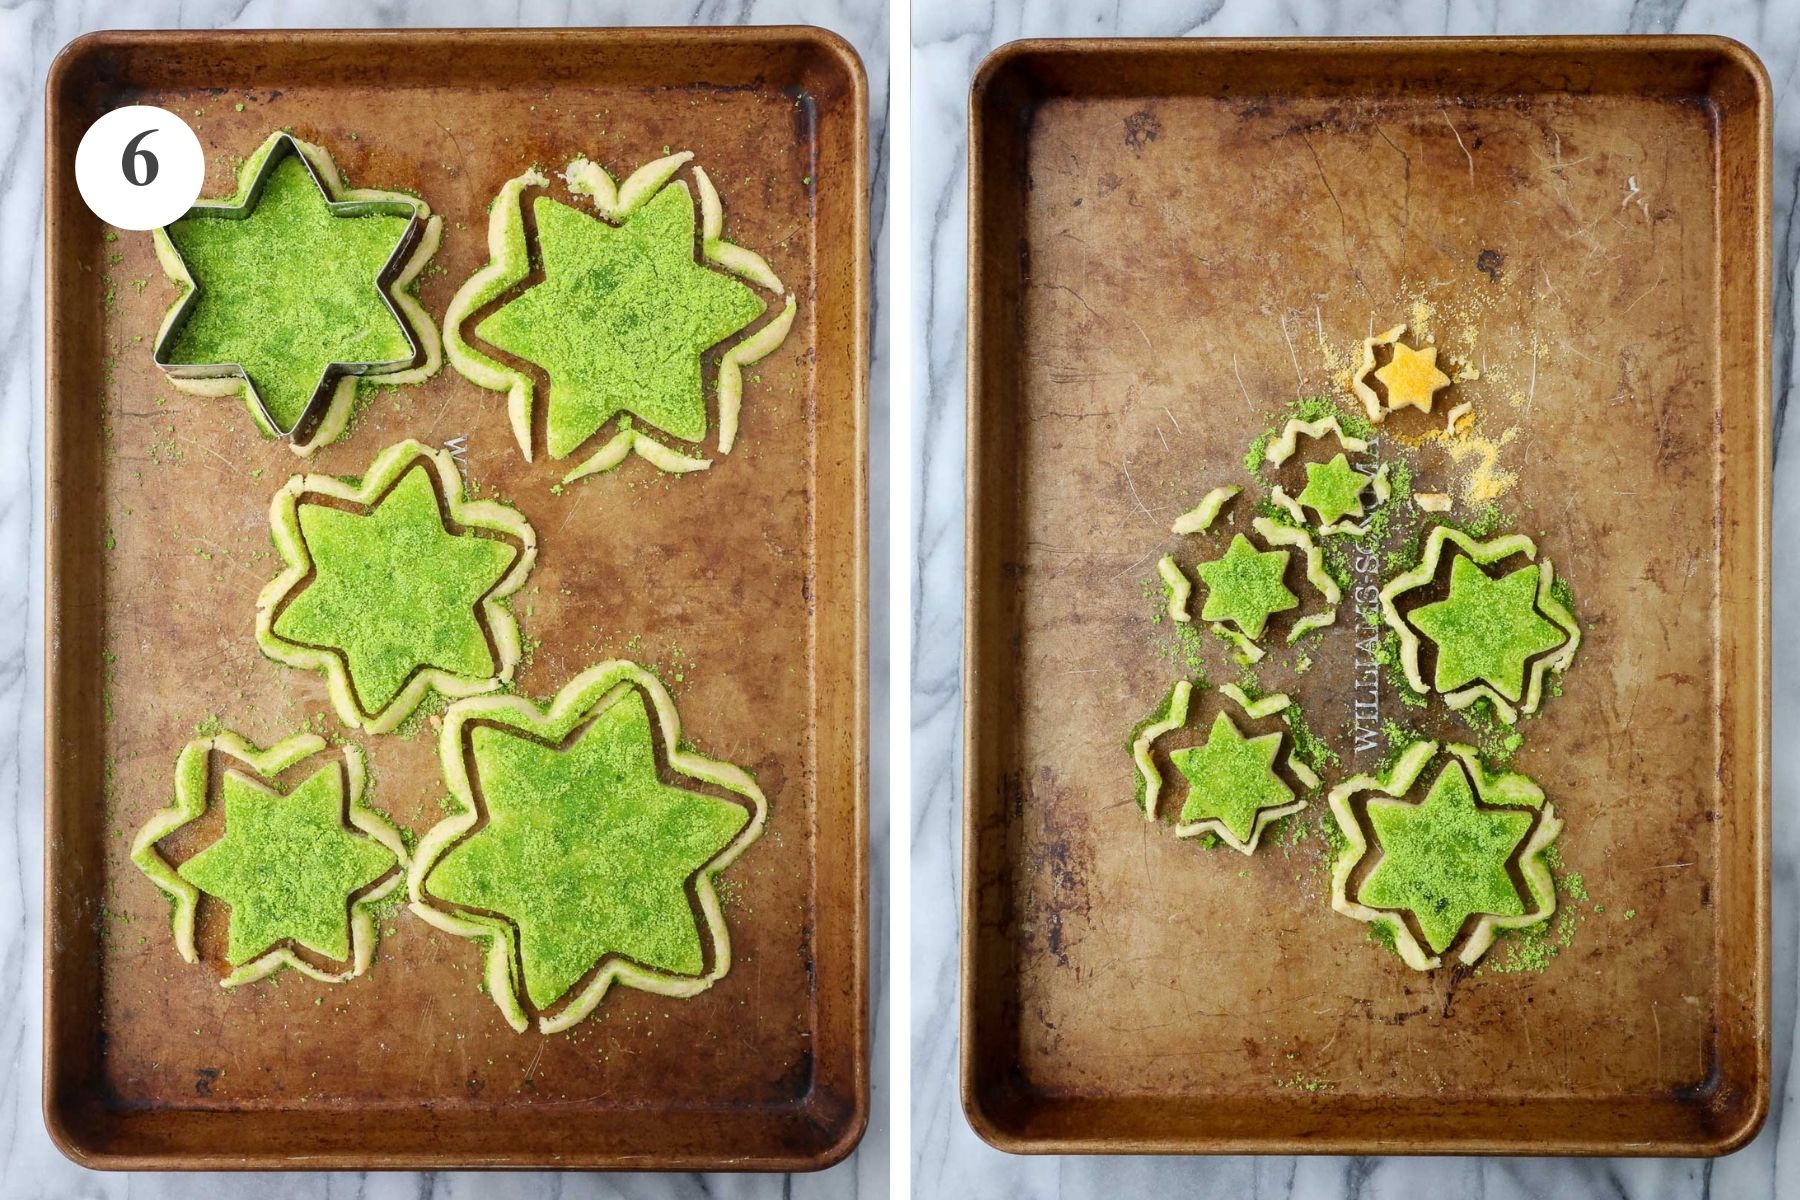
Step 6: Bake and Recut the Cookies:
Bake the larger stars at 350°F for 8-9 minutes.
Remove them from the oven. Using the same cookie cutters that you used to first cut the cookies, recut each cookie. This will give the cookies nice crisp edges as they will have spread ever so slightly in the oven. Let the cookies cool fully on the baking sheet before removing them.
Bake the smaller set of cookies at 350°F for 7-8 minutes. Remove from the oven and recut the cookies with the appropriately sized cookie cutters. Let cool fully on the baking sheet.
Tip: Recut the cookies while they are still warm out of the oven. Recutting the cookies is optional, as the spread in the oven is minimal, but it gives the cookies nice, sharp edges to define the shape of the tree.
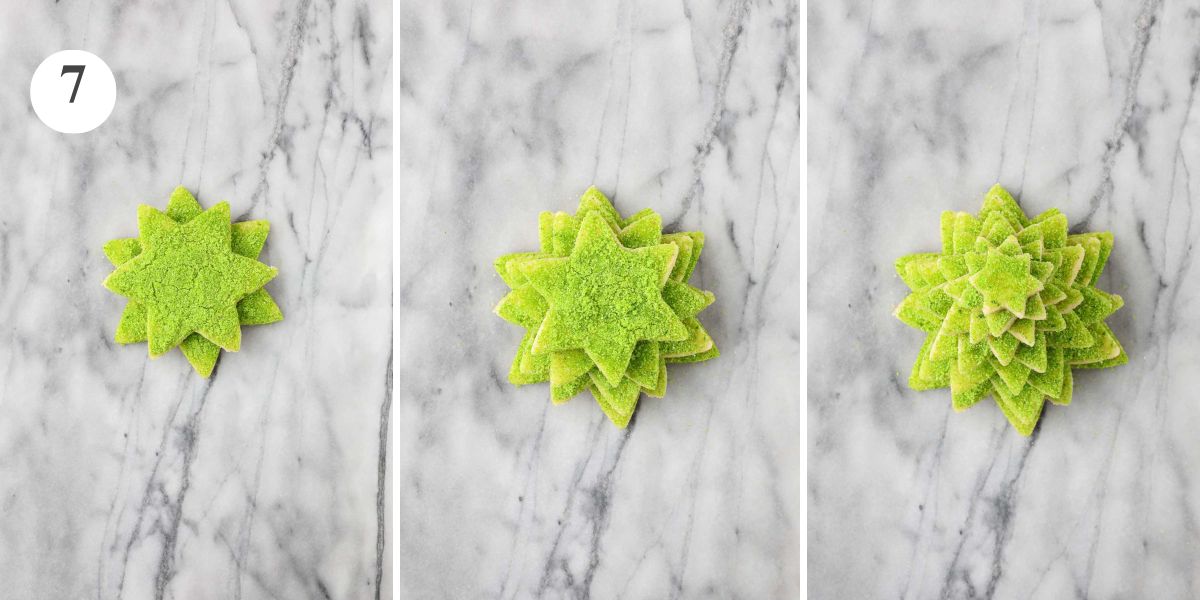
Step 7. Assemble the Christmas Cookie Tree: Place the largest star at the bottom of the tree on a cookie stand, cake plate, or other surface. Continue adding stars from largest to smallest, alternating the points of the stars so that they do not overlap with each other.

Step 8. Place the Star on the Tree: Place the star with the yellow sugar on top of the tree. Use either icing, if you have any on hand, or a small piece of cookie dough to use as glue (don't eat raw cookie dough), or cut off one point of the star to create a flat edge and place it on top of the Christmas Cookie Tree. Set out and display.
🍴Make Ahead and Storage
- Make Ahead: The dough can be made up to 1 week ahead and refrigerated. The cookies can also be made ahead, but are best eaten within 3 to 5 days.
- Assembly and Storage: It's best to wait to assemble the tree until the day of serving. This makes it easier to store the cookies in an airtight container, which keeps them fresher for longer. If you are making it for display only, it can be made a week or more in advance, and left out at room temperature.
✏️ Christmas Cookie Tree FAQ
To prevent cracks, it's best to measure the amount of flour with a kitchen scale.
However, if the dough is too dry or cracks when you roll it out, add one teaspoon of water at a time and work it into the dough. Then roll it out.
These cookies will spread slightly, but the recipe calls for recutting the cookies after they come out of the oven, which will give them nice crisp edges.
It always helps to do a test cookie before baking a whole batch when working with a new recipe. This will help you to gauge if you need to add more flour to the dough.
The best way to ensure the cookies have the right amount of flour so that the dough is not too dry and not too soft is to use a kitchen scale and weigh out the amount of flour as indicated in the recipe.
Yes, the dough can be made and refrigerated up to a week in advance.
Yes, the recipe can easily be doubled. One batch of dough is enough for one tree (with 10 star cookies or layers and the star on top), plus a few extra just-in-case cookies. If you make a double batch, you'll have enough to make three Christmas Cookie Trees (but without extra just-in-case cookies).
💖 More Christmas Cookie Ideas You May Love


If you've tried this Christmas Cookie Tree Recipe or any other recipe on my site, please leave a 🌟 star rating and let me know how it went in the 📝 comments below. I'd love to hear from you!

Christmas Cookie Tree
Ingredients
Cookies
- 1 cup butter, softened
- ¾ cup granulated sugar
- 2 large egg yolks
- 1 teaspoon vanilla extract
- ½ teaspoon salt
- 2 cups all-purpose flour 280g
Sanding Sugar
- ½ cup + 2 tbsp granulated sugar divided
- 15 drops green food coloring
- 4 drops yellow food coloring
Instructions
- Note: This recipe requires that you have a set of concentric star-shaped cookie cutters.
- Make the Dough: In a large mixing bowl, combine the butter and granulated sugar until light and fluffy. Add the egg yolks, vanilla extract, and salt, and combine. Add the flour and combine
- Chill the Dough: Shape the dough into a ball, then flatten it into a thick rectangular slab. Cover in plastic wrap and refrigerate for 30 minutes to an hour or overnight.
- Make the Sanding Sugar: In a medium bowl, add ½ cup granulated sugar and 12-15 drops of green food coloring (you can also use green food gel). Use the back of the spoon to mash the food coloring into the sugar, continuing to work it in until all bits of the coloring are dispersed and the sugar looks a bright, vibrant green.To make the yellow sanding sugar, combine 2 tablespoons of granulated sugar and about 4 drops of yellow food coloring, and use the back of a spoon to mash the food coloring into the sugar.
- Preheat the Oven: When ready to make the cookies, preheat the oven to 350°F.
- Roll Out and Cut the Dough: Place the dough on a clean work surface sprinkled with flour. Sprinkle the top of the dough and the rolling pin with flour and roll out the dough so that it is just slightly less than ½ inch thick. If the dough is too cold, let it sit out at room temperature for 15-20 minutes to warm up. Use the star cookie cutters to cut out one star per cookie cutter size, starting with the largest cookie cutter and working your way to the smallest cookie cutter.
- After cutting the first set of stars, scrunch up the dough and roll it out a second time to fit the second set of stars. Cut two of the smallest-sized stars. One will be green and placed flat at the top of the tree, and one will be yellow (gold) and stand upright on top of the tree. Save a tiny bit of raw cookie dough to use as glue to glue the yellow star to the top of the Christmas Cookie Tree.
- Place the largest stars on one baking sheet and the smaller stars on a second baking sheet. Because of the size difference, they will bake at slightly different times.
- Decorate the Cookies: Using a spoon and your fingers, cover all but one of the two smallest stars in green sanding sugar. Cover the other smallest star in yellow sanding sugar. Press the sugar into the cookie very lightly (you do not need to press hard) with the back of a spoon. The sugar will melt slightly in the oven and adhere to the cookies
- Bake the larger-sized cookies in the oven at 350°F for 8-9 minutes. Remove the cookies from the oven and immediately take the same cookie cutters to recut the cookies while they are still warm out of the oven. This will give the cookies nice crisp edges as they will have spread ever so slightly in the oven.Bake the baking sheet with the smaller stars for 7-8 minutes. Remove and recut each cookie with the appropriately sized cookie cutter. Let the cookies cool on the baking sheet before removing them.
- To assemble the Christmas Cookie Tree: Place the largest star at the bottom. This can be done on a plate, cake stand, or other surface, like a cardboard circle wrapped in wax paper. Continue to stack the star cookies on top of each other, moving from largest to smallest, and turning each cookie slightly so that the points of the stars do not overlap the cookie underneath. Place the cookie with the yellow sanding sugar on the top. You can attach the yellow cookie with a bit of icing if you have some, or with a tiny bit of leftover raw cookie dough (be sure not to eat the raw cookie dough). Alternatively, cut off one point of the yellow star so that it will sit flat on top of the Christmas Cookie Tree. Set out and display!


Leave a Reply